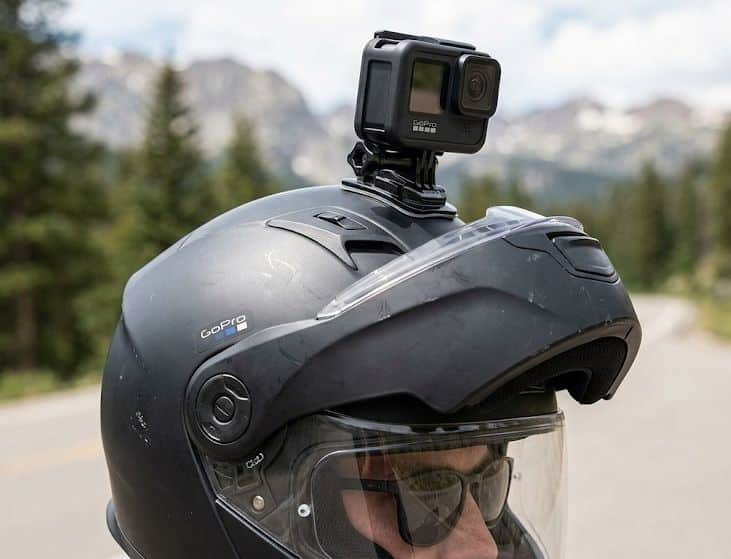
A helmet is still one of the best places to mount a GoPro because it captures the action from your actual point of view. Wherever you look, the camera follows, which is what makes a good GoPro helmet mount feel far more immersive than footage from a fixed handlebar, motorcycle, or kayak mount.
Quick answer: For general helmet use, an official GoPro adhesive mount is the place to start. For riders with a compatible full-face motorcycle or mountain-bike helmet, a chin mount gives a more centered point of view and often produces more natural-looking riding footage. See our GoPro motorcycle mount guide for handlebar and dash options as well.
Not every GoPro helmet mount works the same way. A side adhesive mount gives a different perspective than a front mount. A chin mount puts the camera close to the centerline of a full-face helmet. A top mount gives a higher angle, but it also sits farther from the helmet’s center of mass and can wobble more than a lower-profile setup.
The right choice depends on the helmet, the activity, the camera angle you want, and how much hardware you are comfortable attaching to your helmet. Surface preparation matters too. A quality adhesive mount can work extremely well, but even the best adhesive base can fail if it is installed on a dirty, textured, damp, or incompatible surface.
Why Mount a GoPro on Your Helmet?
The biggest advantage of a helmet mount is line-of-sight footage. On a motorcycle, the camera moves as you look through a corner. On a mountain bike, it follows your vision through turns and technical sections. On skis or a snowboard, it tracks the terrain as you choose your line.
That movement can make footage feel more like the experience the rider had rather than simply showing what happened in front of a fixed camera. A helmet can also isolate the camera from some of the high-frequency vibration you get from a mount attached directly to a motorcycle or bicycle.
There are practical advantages too. Not every motorcycle has an ideal camera mounting point, and some cyclists prefer not to add hardware to the handlebars. A helmet setup keeps the camera independent of the vehicle or bike.
GoPro Helmet Mount Styles
Front and side adhesive mounts: The most versatile option for many users. They are compact, simple, and work on a wide range of smooth helmet surfaces when installed correctly.
Chin mounts: Popular with motorcycle and downhill mountain-bike riders using full-face helmets. A good chin position keeps the camera close to the centerline of the rider’s face and often creates an excellent POV angle.
Top mounts: Useful on some helmets, but they place the camera higher and add more wobble. The resulting viewpoint also tends to feel less like normal eye level.
Adhesive replacement kits: Helpful if you own several helmets or want spare bases on hand. Adhesive quality matters most in this category.
| Mount | Mounting Style | Best For | Main Advantage |
|---|---|---|---|
| GoPro Flat + Curved Adhesive Mounts | Adhesive bases | Best overall | Simple official mounting system for curved or flat surfaces |
| GoPro Helmet Front Mount | Helmet mount | Official helmet setup | Designed specifically around helmet camera positioning |
| PULUZ Motorcycle Helmet Chin Clamp Mount | Chin clamp | Full-face motorcycle and MTB helmets | Centered riding POV without a permanent adhesive base |
| WLPREOE Universal Motorcycle Helmet Chin Mount | Adhesive chin mount | Low-profile chin placement | Keeps the camera close to the front of a compatible helmet |
| Sametop Adhesive Helmet Mount Kit | Curved and flat adhesive bases | Multiple helmets and spare bases | Includes multiple curved and flat mounting bases |
Best GoPro Helmet Mounts
1. GoPro Flat + Curved Adhesive Mounts: Best Overall
If you want a reliable starting point for mounting a GoPro to a helmet, the official GoPro Flat + Curved Adhesive Mounts are hard to argue against. You choose the curved or flat base that best matches the mounting surface, install it, and use the standard GoPro buckle system to attach the camera.
The curved base is the more relevant choice for helmet use, since most helmet shells have some curvature. What matters is getting as much contact as possible between the adhesive pad and the helmet. If a base rocks or leaves gaps around the edges, it is probably not the right spot.
Best for: Riders who want an uncomplicated GoPro mounting system without a helmet-specific clamp.
Main drawback: An adhesive base stays put once applied, so take the time to choose the location before sticking it down.
2. GoPro Helmet Front Mount: Best Official Helmet Mount
If you know the GoPro is going on a helmet and want an official accessory built for that job, the GoPro Helmet Front Mount is a strong option. Rather than assembling a helmet setup from unrelated adapters, it gives you a purpose-built configuration from the company that makes the camera.
Front placement is especially useful when a chin position is not possible and a side mount produces too much of an offset view.
Best for: Riders who want an official GoPro helmet solution and don’t need a motorcycle-specific chin mount.
Main drawback: The best mounting location still depends on helmet shape. A purpose-built accessory doesn’t guarantee a good adhesive surface everywhere.
Our recommendation: If you don’t have a specific reason to use a chin or clamp mount, start with an official GoPro adhesive setup. It’s a dependable choice for a wide range of helmets and activities.
3. PULUZ Motorcycle Helmet Chin Clamp Mount: Best Clamp-Style Chin Mount
For a full-face motorcycle or mountain-bike helmet, a chin position gives you one of the best action-camera viewpoints, placing the lens close to eye level near the centerline of the helmet. The PULUZ uses a clamp-style chin design rather than a permanent adhesive base, which appeals to riders who want centered footage without committing to glue on the front of the helmet.
The main limitation is fit. Full-face helmets vary a lot around the chin bar, and vents, contours, and modular hinge mechanisms can all affect whether a clamp fits properly.
Best for: Full-face motorcycle or downhill MTB helmets with a chin area that accommodates the clamp securely.
Main drawback: Not a universal fit. Inspect your helmet’s chin-bar shape and controls before choosing this style.
4. WLPREOE Universal Motorcycle Helmet Chin Mount: Best Adhesive Chin Option
The WLPREOE targets riders who want the centered viewpoint of a chin mount but prefer an adhesive installation over a clamp around the helmet. It lists broad compatibility with GoPro and other action cameras, and its low-profile shape keeps the camera close to the chin area without stacking on extra arms and adapters.
This style makes the most sense on a helmet with enough smooth surface around the chin for the base to conform properly; heavily vented or angular chin bars are a poor match.
Best for: Riders who want chin-level POV footage and have a helmet shape suited to an adhesive chin installation.
Main drawback: The helmet’s chin-bar shape largely determines whether this style works. Don’t force an adhesive mount onto a surface that won’t sit flat.
5. Sametop Adhesive Helmet Mount Kit: Best for Extra Mounting Locations
If you own multiple helmets or simply want several mounting positions available, the Sametop kit offers more flexibility than buying one adhesive base at a time. It includes curved and flat mounts with adhesive backing, useful for placing bases on more than one helmet or experimenting with camera location.
I would still reach for an official GoPro mount as the first choice for a primary installation, but this set is a solid value pick when quantity and flexibility matter more.
Best for: Multiple helmets, spare bases, or riders who want several GoPro mounting locations on hand.
Main drawback: An aftermarket alternative, so it wouldn’t be the first choice over an official GoPro mount for a single primary helmet installation.
Before Mounting a GoPro to Your Helmet
A helmet is protective equipment first and a camera platform second. Check the instructions supplied by the helmet manufacturer before attaching any accessory: do not drill into the shell, cut or modify the impact-absorbing foam, or block vents, visor mechanisms, or modular-helmet controls. Use a helmet designed and certified for your activity, and inspect the complete setup before each ride for loose hardware or damaged adhesive.
Important: GoPro recommends following the helmet manufacturer’s instructions for safe helmet use. A camera mount should never require you to compromise the helmet’s normal operation or make structural modifications to the shell.
Best GoPro Helmet Mount Position
Chin mount: For many motorcycle riders with full-face helmets, the chin area provides the most natural-looking POV, keeping the camera close to eye level and near the helmet’s center. The downside is compatibility: large chin vents, unusual contours, or a modular hinge can rule out a particular chin mount.
Front mount: A good alternative when chin mounting isn’t practical. Depending on helmet design, it can still give a centered view while leaving room to adjust the angle.
Side mount: Extremely versatile and works well on helmets with a large smooth area on either side, though the perspective is slightly offset from the rider’s centerline.
Top mount: Can work when other locations aren’t available, particularly on smooth sports helmets, but the viewpoint sits higher and farther from the center of the rider’s head, which adds more wobble than a lower-profile setup.
How to Install an Adhesive GoPro Helmet Mount
Good installation matters as much as the mount itself. GoPro recommends applying its adhesive mounts to a clean, smooth, non-porous surface and letting the adhesive cure for at least 24 hours at room temperature before use.
- Choose the position first. Hold the camera and mount against the helmet and check the angle with the GoPro preview before removing the adhesive backing.
- Confirm the base matches the surface. A curved base should sit against the helmet without excessive rocking or large gaps.
- Clean and dry the mounting area. Dirt, oil, wax, and moisture weaken the adhesive bond.
- Apply at room temperature. Avoid attaching to a cold or damp helmet.
- Press firmly across the entire pad. Full surface contact matters.
- Wait at least 24 hours before use. Don’t install a mount right before a ride and expect full bond strength.
- Check before every use. Look for lifting edges, looseness, or worn hardware.
Installation tip: Do a short camera-angle test before your first real ride. A secure mount isn’t very useful if half the footage shows the sky or the top of your motorcycle’s instrument panel.
Getting Better GoPro Helmet Footage
Keep the camera close to the helmet. Every extra pivot arm moves the camera farther out and amplifies movement. Use only as much extension as you need for the correct angle.
Check your horizon. A small adjustment to camera angle makes a big difference in POV footage. Preview it before starting your ride.
Set the angle wearing the helmet in your normal riding position. Motorcycle riders often tilt their heads differently while riding than while standing in the garage.
Avoid over-complicating the mount. Fewer joints mean less bulk, less wind drag, and a cleaner final shot. Choosing a location based on appearance alone, ignoring helmet shape, or riding immediately after applying adhesive are the most common ways a helmet mount setup goes wrong.
Frequently Asked Questions
Where should I mount a GoPro on a motorcycle helmet?
For a compatible full-face helmet, the chin area is one of the best positions for centered POV footage. Front and side adhesive mounts are excellent alternatives when the helmet shape doesn’t work well with a chin mount.
How long should a GoPro adhesive mount cure?
GoPro recommends letting an adhesive mount sit at room temperature for at least 24 hours before use, on a clean, smooth, dry, non-porous surface.
Is a curved or flat GoPro mount better for a helmet?
A curved mount is usually the better match, since most helmet shells are curved. The right base is the one that gives good contact across the adhesive surface without rocking or leaving gaps.
Can I move an adhesive GoPro mount to another helmet?
The base itself isn’t meant to be moved repeatedly. A better approach is to install a separate base on each compatible helmet and move the camera or quick-release buckle between them.
Bottom Line
The best GoPro helmet mount depends on your helmet and the footage you want. For the widest range of uses, the official GoPro Flat + Curved Adhesive Mounts are the first choice: simple, compact, and flexible in where the camera sits.
If you ride with a full-face motorcycle or mountain-bike helmet and want a centered rider’s-eye view, a chin mount is worth considering. The PULUZ offers a clamp-style option, while the WLPREOE takes an adhesive approach. Either way, helmet shape matters more than a product’s claim of broad compatibility. Keep the setup simple, follow both the mount and helmet manufacturer’s instructions, and give an adhesive mount time to bond before heading out.
Related Mount Guides
More GoPro and camera mounting guides from MountGuys: