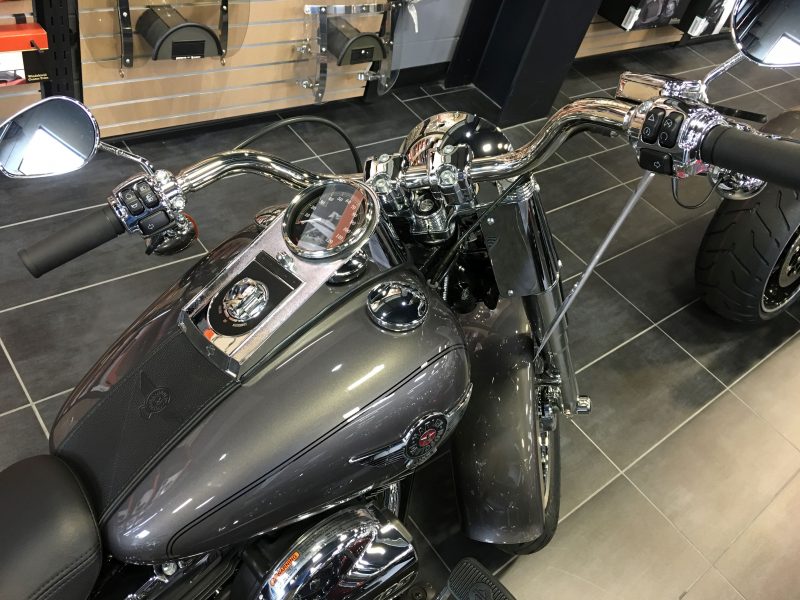
The Harley-Davidson Fat Boy cockpit hasn’t changed much in the basics: thick 1.25-inch handlebar with room on both sides of the stem and clutch/brake reservoirs that sit right where you can see them without craning. These two spots still dominate for a reason—they use existing sturdy points, keep controls free, and let you position a device so it’s usable with gloves on at speed.Vibration is the Fat Boy’s reality. The big twin shakes at idle and transmits buzz through the bars on the highway. Weak mounts loosen, plastic arms flex, and your phone ends up dancing or your camera footage turns into a blurry nightmare. Solid mounts use aluminum or marine-grade parts, rubber isolators to protect chrome, and strong ball-and-socket arms that stay put while giving you the exact angle you need.
Handlebar clamps fit the standard 1.25-inch diameter with rubber strips to avoid marring finishes. Reservoir mounts replace factory bolts with longer stainless hardware—no drilling, just careful installation. Both keep added weight low and centered so the bike still feels like a Fat Boy.
Best overall phone mount: RAM X-Grip with Handlebar U-Bolt Base (fits 0.5″–1.25″ bars)
Mounting Locations That Work on the Harley-Davidson Fat Boy
The handlebar is the most straightforward spot. Mount slightly offset left or right of center so the screen falls in your peripheral vision without blocking the speedo or forcing bad posture. The 1.25-inch diameter takes standard U-bolts or straps—always use the rubber inserts to protect chrome or blacked-out bars.
The clutch reservoir gives the cleanest integrated look. It positions the device lower and closer to the tank, leaving the right side open for brake lever movement. Bolt-on bases swap the factory bolts and look like they came from the factory. Brake reservoir works too, but most riders stick with clutch side to avoid crowding the front brake.
Dead-center bar mounting between the risers usually causes glare or gauge interference. Mirror stems shake more and can limit steering lock. Tank or fender mounts vibrate devices to death and risk paint damage. Adhesive or zip-tie hacks fail fast in heat, rain, and constant vibration. Stick to these two proven locations and you avoid 90% of the headaches.
Best Mounts for Your Harley-Davidson Fat Boy
1. RAM X-Grip Phone Mount with Handlebar U-Bolt Base – Best Overall Phone Mount
This is the proven workhorse for Fat Boy riders. The U-bolt base clamps securely to the 1.25-inch bar with included rubber padding. The X-Grip cradle uses four spring-loaded arms with rubber tips that grip phones—even large modern ones with thick protective cases—without covering the screen or side buttons.
Offset the mount slightly for easy gloved-thumb access to power or controls. The double socket arm lets you dial in height and angle to kill glare and keep maps or audio visible at highway speeds. Safety tether included—use it.
2. Techmount Universal Motorcycle Control Mount with TechGripper – Best Clutch Reservoir Mount
For the cleanest factory-integrated setup, this kit replaces the clutch control bolts with stainless hardware and delivers a solid mounting point right in your natural sightline. Add the TechGripper cradle for your phone or attach a Garmin cradle directly. The design keeps the entire handlebar clear and preserves full lever movement.
It fits virtually all Fat Boy clutch sides and includes the necessary spacers and bolts for proper alignment. Built tough and powder-coated, it looks intentional instead of aftermarket.
3. Arkon Premium Aluminum Motorcycle Handlebar Mount – Best for Garmin Nuvi and Drive GPS
Car-style Garmin units (Nuvi or Drive series) require the 17mm swivel ball this aluminum mount provides. It clamps tight to the Fat Boy’s 1.25-inch bar with rubber protection and installs quickly using the included hex wrench.
Position it high enough for quick glances but low enough to limit wind load. The solid metal construction stands up to the Fat Boy’s buzz far better than plastic alternatives. Keep the wrench in your tool roll for occasional adjustments after long rides.
4. Tackform Brake/Clutch Reservoir Mount – Strong Reservoir Alternative
This billet aluminum base bolts directly to the clutch or brake reservoir using the existing bolt holes and provides dual 20mm balls for maximum adjustability. Pair it with a phone cradle or Garmin holder. It delivers a low, tucked-in position that keeps the handlebar completely free.
5. BRCOVAN Handlebar Rail Mount – Best for Action Camera Video
Action cameras need real vibration control or your footage is unusable. This metal rail mount with platform and adjustable ball-and-socket head keeps the camera steady. Mount it higher on the bar for a clear forward view past the tank and headlight.
This particular mount can serve the dual purpose of handling your camera and a phone. Just add the arm and cradle.
Common Problems on the Fat Boy
Vibration still reaches phone cameras—always combine a good mount with a rugged case and consider extra dampening if shooting a lot of video. Clamps can loosen after heat/cold cycles; apply blue Loctite and recheck torque after the first 100 miles and every few hundred thereafter.
Chrome scratches show instantly without rubber inserts—install them every time. Sun glare kills visibility—test your exact angle in bright daylight before final tightening. Mounted phones drain batteries faster in direct sun; run a short USB cable from a switched accessory circuit or carry a small power bank.
Cheap generic mounts fail precisely when you need them. Stick with brands that test for motorcycle vibration and back their products with real warranties.
Installation Tips
- Clean the bar and reservoir surfaces thoroughly—any dirt or residue causes scratches or slippage.
- Use blue Loctite on all threads and torque to spec; check tightness after the first long ride.
- When bolting to the reservoir, support the assembly and do not overtighten the plastic cover.
- Verify full steering lock and lever travel before hitting the road—test slowly first.
- Route charging cables neatly along the frame using factory clips or quality zip ties.
- Carry the specific hex/Allen wrench for your mount in your roadside tool kit.
Related Mount Guides
RAM X-Grip Cradles – Full Breakdown
Phone Tethers – Why You Need One
Universal Motorcycle Phone Mounts Compared
Bottom Line
On the Harley-Davidson Fat Boy, the handlebar and clutch reservoir are still the only two locations that give you secure, usable, good-looking results without compromise. Start with the RAM X-Grip Handlebar U-Bolt Mount for easy installation and total flexibility. Go with the Techmount Control Mount with TechGripper if you want the cleanest bolt-on integration that leaves the bars open.
Pair either with a quality protective case, use the rubber pads and tethers, and your setup will survive real riding for years. Skip the cheap plastic junk—it always lets go at the worst time. Mount once, mount right, and keep your eyes on the road where they belong.
