Editorial Disclosure: MountGuys has been working on mounting solutions and guides for over 20 years. Our recommendations are based on real-world installation experience across vehicles, motorcycles, and marine setups — not just product specs. We may earn a commission if you purchase through our links, which helps support our testing.
RAM Mounts are one of the most versatile mounting systems ever made, but that flexibility is also what confuses people. Once you move beyond buying a single prebuilt kit, you quickly run into terms like B size, C size, double socket arm, AMPS plate, handlebar base, and extension adapter. If you do not understand how those parts fit together, it becomes very easy to buy the wrong piece, mix incompatible sizes, or build a setup that shakes more than it should.
This guide is the starting point. It explains how the RAM system works, what the different ball sizes mean, how arms and bases affect stability, when extensions make sense, and how to choose the right setup for cars, motorcycles, GPS units, tablets, cameras, and marine electronics.
What Is a RAM Mount System?
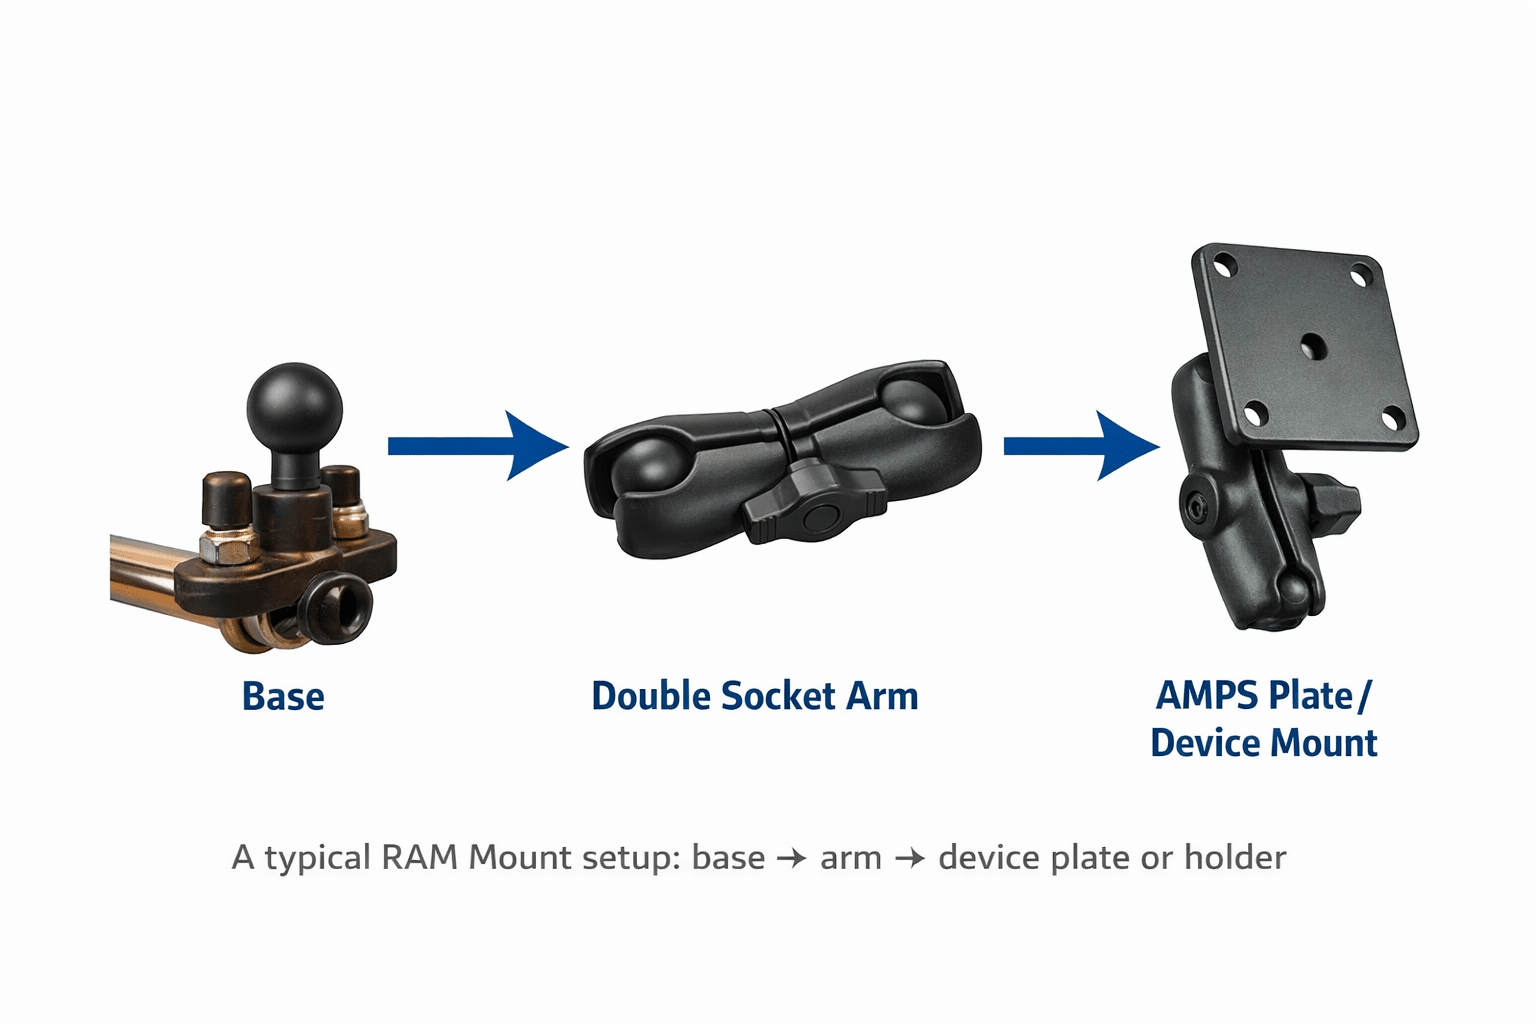
At its core, a RAM Mount system is a modular ball-and-socket mounting platform. Most setups start with a mounting base that has a rubber-coated ball. That ball connects to a double socket arm. The other end of the arm connects to a second ball attached to a cradle, holder, or adapter plate.
That modular design is the reason RAM works in so many places. You can start with a suction base in a car, a handlebar base on a motorcycle, a flat surface base on a boat, or a seat bolt base in a truck — then reuse the same basic system architecture around it.
In real installs, this is what makes RAM different from simpler one-piece mounts. Instead of buying a completely new mount every time your use case changes, you can often keep some components and only swap the parts that need to change.
The Three Core Parts of a RAM Setup
1. The Base
The base is the foundation. This is the part that actually attaches to the vehicle, desk, rail, dash, handlebar, yoke, seat bolt, flat panel, or windshield. If the base is weak, the whole setup is weak.
Common RAM base types include:
- Flat surface and drill-down bases
- Handlebar and U-bolt bases
- Brake and clutch reservoir bases
- Fork stem bases
- Suction cup bases
- Seat bolt bases
- Rail and clamp bases
One of the biggest real-world mistakes people make is focusing too much on the arm and not enough on the base. But if the base flexes, vibrates, or can be removed easily, the rest of the system cannot make up for it.
2. The Arm
The arm is the connector that clamps onto two balls. RAM arms come in different lengths, and that length matters more than people think. A short arm is usually the most stable. A medium or long arm gives more reach and flexibility, but it also creates more leverage and more potential for vibration.
That means the right arm length depends on what you are mounting and where you are mounting it. In a car, a slightly longer arm is often fine. On a motorcycle or boat, a shorter arm is usually the safer choice unless you absolutely need extra reach.
3. The Holder, Plate, or Adapter
The final piece is whatever actually holds the device. This might be a phone cradle, a GPS-specific holder, a tablet cradle, a round plate using the AMPS pattern, or a camera adapter. This is also where many people jump too quickly into buying products before understanding the rest of the system.
For some setups, the holder is vehicle- or device-specific. For others, it is universal. Both approaches have a place. A custom cradle usually gives the cleanest fit. A universal holder gives more flexibility if you change devices often.
RAM Ball Sizes Explained
If you understand one thing about RAM Mounts, make it this: ball size determines capacity, stability, and compatibility.
The most common sizes you will run into are:
| Size | Common Name | Typical Use |
|---|---|---|
| 1 inch | B size | Phones, many GPS units, small tablets, light accessories |
| 1.5 inch | C size | Heavier tablets, marine electronics, rougher environments |
| 2.25 inch | D size | Large marine displays and very heavy-duty setups |
Most everyday car, phone, and GPS setups use the 1-inch B-size system. That is the sweet spot for compact devices and lighter loads. But once you move into larger tablets, rough off-road environments, or heavier marine electronics, stepping up to C size often makes more sense.
For a deeper breakdown, see our dedicated guide on RAM ball sizes: B vs C vs D.
RAM Arms Explained
Arms are where RAM setups become highly adjustable, but arm length is also where people create problems for themselves. The longer the arm, the more movement you introduce. That does not mean longer arms are bad. It just means they need to be used intentionally.
Short arms are best when stability matters most. Medium arms are usually the best all-around choice. Long arms are useful when you need reach around dashboards, windshields, or fairings, but they should not be your default answer.
In real installs, the mistake is usually using a long arm where a better base position or a slightly different holder would have solved the problem more cleanly. The cleaner the geometry, the better the setup tends to perform.
Your dedicated arm guide should live at a page like RAM Mount arms explained.
RAM Bases Explained
Bases matter as much as any other part in the system. A bad base can make a good arm feel unstable. A strong base can make even a modest setup feel secure.
Which base is right depends on the environment:
- Cars: suction, drill-down, seat bolt, and some vent-compatible systems depending on the use case
- Motorcycles: handlebar, brake/clutch, fork stem, mirror stem, or bolt-down
- Marine: flat surface and drill-down bases are usually the safest starting point
- Aviation: yoke mounts, suction mounts, and panel-compatible adapters
- Desk or shop use: clamp bases, flat bases, and drill-down installations
If your cluster is built right, this section should support a dedicated article at RAM Mount bases explained.
How RAM Mount Extensions Work
Extensions are one of the most misunderstood parts of the RAM ecosystem. People often think an extension replaces the arm. It does not. A proper extension setup typically works like this:
Base → Arm → Extension Adapter → Arm → Device Holder
That means adding reach often requires an additional arm and a double-ball-style connector. The setup works, but every added joint introduces another potential movement point. That is why longer RAM extensions can work beautifully in a stationary or low-vibration environment, but become frustrating if pushed too far on a motorcycle, boat, or off-road vehicle.
For the full breakdown, see our extension page: RAM Mount extensions explained.
Best RAM Mount Setups by Use Case
Cars and Trucks
For most cars, B-size RAM components are enough for phones and many GPS units. The best setup usually depends on where you want the device: windshield, dash, seat rail, or custom surface mount. Trucks and fleet vehicles often benefit from stronger bases and slightly longer arms because interior reach becomes more important.
Relevant supporting pages:
Motorcycles
Motorcycle setups require much more discipline because vibration matters so much. Shorter arms and more secure bases usually win. Handlebar, brake/clutch, and fork stem mounts are common. For phones and many GPS units, B-size is normal, but weight and exposure can change what works best.
Relevant supporting page: Motorcycle Mount Guide
Marine Electronics
This is where ball size becomes critical. Many marine electronics move beyond B size quickly. Heavier displays, rougher water, and exposed conditions all push you toward stronger bases and often C-size or larger systems.
Relevant supporting page: Marine Electronics Mounting Guide
Tablets and Heavy Devices
Large tablets expose weakness quickly. This is where undersized components, overly long arms, and weak bases all show up fast. If you are mounting a tablet in a work truck, boat, or service environment, you generally want a stronger-than-minimum setup.
Relevant supporting page: Tablet Mount Guides
Common RAM Mount Mistakes
- Choosing the wrong ball size: the most common problem, especially with heavier devices
- Using too much arm: extra reach often creates extra vibration
- Underestimating the base: a weak base compromises the whole mount
- Stacking too many joints: extensions solve reach problems, but too many added pieces create movement
- Buying parts out of sequence: people often buy a holder first instead of building the system logically
How to Build a RAM Setup the Right Way
How a RAM Mount System Works
Every setup follows the same structure: a base attaches to your vehicle, an arm positions the device, and a holder secures it.
Ball size determines strength • Arm length affects reach • Base determines placement
If you want to avoid wasting money, build in this order:
- Choose the device — phone, GPS, tablet, camera, fish finder, radio, etc.
- Choose the environment — car, motorcycle, truck, boat, aircraft, desk, shop
- Choose the base — where will it attach?
- Choose the ball size — based on weight and vibration
- Choose the arm length — use the shortest arm that still works
- Choose the holder or plate — custom-fit or universal
This order matters. It keeps you from buying random parts and hoping they fit together later.
Related RAM and Mount Guides
Bottom Line
RAM Mounts look complicated until you understand the system. Once you do, they become one of the easiest mounting ecosystems to work with because everything starts to make sense: base, arm, ball size, and holder.
If you are building a new setup, the smartest move is to stop thinking in terms of one product and start thinking in terms of a system. Choose the right base first, choose the right ball size second, and use only as much arm and extension as the job actually needs.
That is how you get a RAM setup that feels solid instead of improvised — and why the system has remained so popular across cars, motorcycles, marine electronics, aviation, and heavy-duty use.