
Finding the right Tapo C400 mounts is much easier than outfitting TP-Link’s motorized pan-and-tilt cameras because every version of the Tapo C400 uses a standard 1/4-20 threaded mounting socket. Whether you own the current hub-free Tapo C400, the solar-powered Tapo C400 KIT, or the original hub-based Tapo C400S2 two-camera system, both the camera body and the companion Tapo solar panel work with universal 1/4-20 brackets. That standard thread lets you move beyond the screw-in bracket in the box and install your camera or solar panel on vinyl siding, rain gutters, shaded eaves, and fence posts without drilling permanent holes.
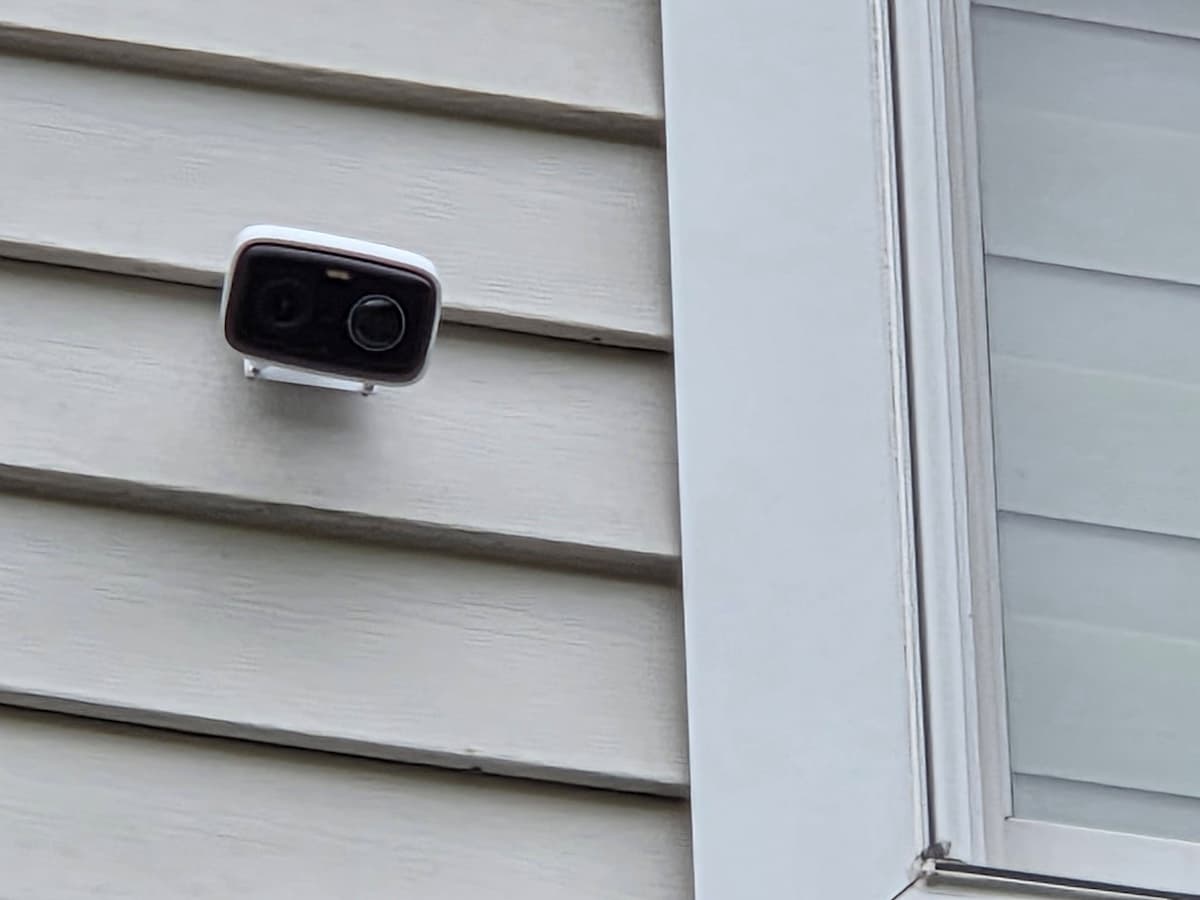
Quick Answer: For flat wood trim, brick, or stucco where drilling is fine, use the 1/4-20 screw brackets included in the Tapo C400 or Tapo C400 KIT box. For no-drill installs, choose the Holicfun No-Drill Vinyl Siding Mount for horizontal lap siding, the Wasserstein Weatherproof Gutter Mount for single-camera eave placement, or the OkeMeeo 2-in-1 Camera & Solar Panel Gutter Mount to hold both the Tapo C400 KIT camera and its solar panel on one gutter clamp. If your camera sits under a shaded soffit, use the Holicfun Solar Panel Extension Wall Mount to reach past the roofline, or the Augstci No-Drill Pole Mount for downspouts and posts.
This guide explains the hardware differences between the current Tapo C400 (and C400 KIT) and the earlier Tapo C400S2, compares the best aftermarket mounts for the camera and solar panel, and covers the placement rules that prevent upside-down video and dead batteries. To browse mounting hardware for other models across your property, visit our security camera mounts hub. If you want a deeper look at the camera’s 1080p video performance, color night vision, and battery life before installing it, see the TP-Link Tapo C400 review on HomeCamCafe.
Best Tapo C400 Mounts and C400 KIT Solar Mounts Compared
The table below compares the factory brackets included with the Tapo C400 and Tapo C400 KIT against the five best 1/4-20 aftermarket mounts for vinyl siding, gutters, shaded eaves, and poles.
| Mount | Fits / Attachment | Best For |
|---|---|---|
| Included TP-Link Factory Bracket(s) | 1/4-20 screw-in camera base + 3-screw solar bracket (drilling required) | Flat wood fascia, trim boards, brick, or stucco walls |
| Holicfun No-Drill Vinyl Siding Mount | Aluminum siding seam hook with 1/4-20 swivel ball head | Mounting the Tapo C400 camera or solar panel on horizontal vinyl siding |
| Wasserstein Weatherproof Gutter Mount | No-drill dual-thumbscrew gutter clamp with 1/4-20 stud | Single Tapo C400 camera or standalone solar panel on a rain gutter |
| OkeMeeo 2-in-1 Camera & Solar Gutter Mount | No-drill gutter clamp with dual 1/4-20 adjustable swivel heads | Tapo C400 KIT owners mounting the camera and solar panel together |
| Holicfun Solar Panel Extension Wall Mount | Extended multi-angle 1/4-20 arm (wall screws + vinyl siding clips included) | Projecting the Tapo solar panel past shaded eaves or roof overhangs |
| Augstci No-Drill Security Camera Pole Mount | 1/4-20 metal ball mount with 4 stainless band clamps (2 to 17 in.) | Strapping the Tapo C400 or solar panel to downspouts, poles, or posts |
Tapo C400 vs. Tapo C400 KIT vs. Tapo C400S2: Hardware and Thread Compatibility
TP-Link has sold two distinct outdoor battery camera designs under the Tapo C400 name, plus a solar bundle. Before you choose a mounting location or run a charging cable, it is helpful to verify which version you own:
- Tapo C400 (Current Hub-Free US Model): A compact rectangular camera (3.19 by 1.89 by 2.3 inches) that connects directly to 2.4 GHz Wi-Fi without an indoor hub. It features a built-in 5,200mAh rechargeable battery, an onboard microSD card slot (up to 512 GB) next to a USB-C charging port under a bottom rubber flap, and a standard 1/4-20 female threaded hole on the back of the camera body.
- Tapo C400 KIT (Camera + Solar Panel Bundle): Pairs the exact same rectangular, hub-free Tapo C400 camera with TP-Link’s weatherproof solar panel and a 4-meter (13-foot) charging cable with a fitted waterproof gasket. As little as 45 minutes of direct daily sunlight keeps the camera charged year-round.
- Tapo C400S2 (Original 2-Camera + H200 Smart Hub System): A slightly larger cylindrical bullet camera (4.35 by 2.52 by 2.52 inches) that uses a removable Tapo A100 battery pack, connects through the indoor Tapo H200 Hub, and charges via a Micro-USB port (often paired with the Tapo A200 solar panel). Despite the cylindrical shell, the C400S2 uses the exact same 1/4-20 female thread on the rear of the housing.
Because TP-Link standardized on the 1/4-20 UNC screw thread across the Tapo C400, C400 KIT, C400S2, and sibling models like the C402, C403, C410, and C420, every 1/4-20 camera mount on this page fits all of them. Furthermore, if you add a standalone Tapo A200 or Tapo A201 solar panel to your setup, you can either screw the panel onto TP-Link’s included tilting bracket or use a 1/4-20 gutter, siding, or extension mount to position the panel in full sun.
Important Firmware Note on Ceiling Installs: Unlike TP-Link’s indoor pan-and-tilt cameras, the Tapo C400 firmware does not include a 180-degree Invert Image toggle in the Tapo app. In addition, the camera’s passive infrared (PIR) motion sensor and bottom USB-C waterproof seal are engineered to sit on the underside of the housing. Always mount the Tapo C400 right-side up with the lens above the PIR sensor, even when attaching a bracket beneath an eave or soffit.
How the Included Factory Brackets Work (And When You Need an Upgrade)
Inside the box of the standalone Tapo C400, TP-Link includes a circular screw-in base with a threaded 1/4-20 ball shaft and a locking collar, along with a drilling template, two wall anchors, and two mounting screws. You drive the two screws into a flat wall, thread the camera onto the 1/4-20 stud until it is oriented upright, and tighten the outer plastic collar against the back of the camera to lock the viewing angle.
If you purchase the Tapo C400 KIT, you receive a second mounting bracket dedicated to the solar panel. The solar panel bracket anchors with three screws, allowing the panel to tilt and swivel toward the sun, and connects to the bottom of the C400 camera via the 4-meter (13-foot) power cord and its molded silicone weather seal.
The stock hardware works well on flat wood trim, fascia boards, brick, or stucco when you are comfortable drilling holes. However, the factory brackets fall short in four common residential scenarios:
- Horizontal vinyl siding: Driving screws through hollow vinyl siding cracks the PVC panel, voids siding warranties, and allows the camera or solar panel to sag over time unless you hit solid backing.
- High eave and gutter lines: Reaching the recommended 7 to 10 foot elevation often puts the camera at a metal rain gutter where drilling is impractical.
- Shaded camera spots with the C400 KIT: When the best camera angle sits under a deep porch overhang or on a north-facing wall, the solar panel needs an extended arm or a high gutter clamp to catch direct sun.
- Downspouts, porch columns, and fence posts: The flat circular factory base cannot sit flush against a curved pipe, downspout, or round pole.
Best Aftermarket Tapo C400 and Solar Panel Mounts
1. Holicfun No-Drill Vinyl Siding Mount: Best for Siding Homes and Rentals
If your home is finished in standard horizontal lap vinyl siding, the Holicfun No-Drill Vinyl Siding Mount lets you install the Tapo C400 at exact eye or eave height without touching a drill. The mount pairs a low-profile aluminum hook that slides upward into the horizontal seam between two overlapping courses of vinyl siding with an adjustable 1/4-20 ball head built right onto the face of the clip.
Because the Tapo C400 weighs just over half a pound, a single vinyl siding seam holds the camera steady without flexing the panel. You clip the aluminum hook into the siding joint, thread the 1/4-20 screw directly into the back of the Tapo C400 (or Tapo C400S2), and use the 360-degree swivel and 90-degree tilt adjustment to aim the lens about 20 degrees downward toward your walkway or driveway. If you decide to shift the camera a few feet to the left after checking the live view, you can unhook and move the bracket in seconds with zero holes to caulk.
Best for: Renters and homeowners who want a clean, tool-free 1/4-20 mount on standard horizontal vinyl siding.
Limitation: Built for standard horizontal lap vinyl siding with an open bottom seam; does not fit vertical board-and-batten, stucco, or glued foam-backed siding.
2. Wasserstein Weatherproof Gutter Mount: Best Single Gutter Clamp
Clamping your camera to the outer lip of a first-floor rain gutter is one of the fastest ways to achieve TP-Link’s recommended 7 to 10 foot mounting height without drilling into your wood fascia or soffit. The Wasserstein Weatherproof Gutter Mount uses a heavy-duty coated metal U-clamp with two wide thumbscrews that tighten against the inside of the gutter lip while a protective backing plate prevents the screws from denting thin aluminum K-style gutters.
Although Wasserstein packages a snap-on Blink adapter in the box, pulling off that plastic cap exposes a standard metal 1/4-20 threaded stud with a locking collar that threads directly into the back of the Tapo C400. The ball joint swivels 360 degrees and tilts 180 degrees, allowing you to mount the clamp over the gutter lip while keeping the Tapo C400 camera body completely upright so the video feed is not inverted. For Tapo C400 KIT owners who mount the camera on a shaded wall below, this single clamp also works as a dedicated gutter mount to elevate a 1/4-20 solar panel into unobstructed roofline sun.
Best for: Mounting a standalone Tapo C400 camera (or a single 1/4-20 solar panel) on an exposed rain gutter lip without tools.
Limitation: Requires an exposed gutter edge; incompatible with gutters covered by solid helmet-style leaf guards.
3. OkeMeeo 2-in-1 Camera and Solar Panel Gutter Mount: Best All-in-One C400 KIT Mount
When you buy the Tapo C400 KIT (or add a solar panel to an existing C400), mounting the camera and the panel separately means installing two brackets on your exterior. If your rain gutter faces south, east, or west and receives at least 45 minutes of direct daily sunlight, the OkeMeeo 2-in-1 Camera and Solar Panel Gutter Mount lets you hang both components on a single no-drill clamp.
Constructed from white powder-coated aluminum alloy and weather-resistant ABS, the OkeMeeo bracket slides over any rain gutter lip or flat vertical fence board up to 0.68 inches thick and locks down with dual thumbscrews. A wide horizontal bar supports two independent 1/4-20 swivel and tilt ball heads side by side. That independent articulation is critical: you can aim the Tapo C400 camera downward toward your driveway or gate while tilting the solar panel upward toward the southern sky so one never casts a shadow across the other. Because the camera and panel sit just inches apart on the same clamp, you can coil and secure the excess 4-meter solar cord neatly behind the bracket instead of stapling wire across your siding.
Best for: Tapo C400 KIT owners who want a zero-drill, single-clamp gutter setup that holds both the camera and solar panel together.
Limitation: Both the camera and solar panel share the same location, so the gutter spot must have both the right camera sightline and direct daily sun.
4. Holicfun Solar Panel Extension Wall and Siding Mount: Best for Clearing Shaded Eaves
A common frustration with solar security cameras is that the best spot for the camera (tucked under a deep soffit or porch roof watching a front door) is also the worst spot for solar charging because the roof overhang shades the wall. While the Tapo C400 KIT includes a 13-foot extension cable, the short stock solar bracket still holds the panel close to the wall where roof shadows cut daily power output.
The Holicfun Solar Panel Extension Wall Mount solves eave shading by projecting your 1/4-20 solar panel outward past the shadow line of the roof overhang and tilting it upward toward the sky. Even better, Holicfun includes both stainless wall screws with masonry anchors and no-drill vinyl siding clips inside the same box. You can screw the extended arm into wood fascia or brick, or hook it directly into a horizontal vinyl siding seam a few feet away from your Tapo C400 camera without drilling a single hole. It also works as an extended reach mount for the C400 camera itself if you need to push the lens past a thick downspout or architectural trim column that blocks part of the 114-degree field of view.
Best for: Extending a solar panel (or Tapo C400 camera) outward past deep roof overhangs on either flat walls or vinyl siding.
Limitation: If your Tapo solar panel uses TP-Link’s slide-on backplate rather than a direct 1/4-20 center hole, attach the panel via its 1/4-20 adapter point or verify the backplate thread before mounting.
5. Augstci No-Drill Security Camera Pole Mount: Best for Downspouts, Posts, and Trees
Because the Tapo C400 and Tapo C400 KIT run entirely on battery and solar power without a 120V power adapter, you do not have to mount the camera on the house at all. Strapping the camera to a corner gutter downspout, porch column, fence post, or yard lamp post looking back toward your garage or entry door often gives you a cleaner lateral motion-detection angle than a flat house wall.
The Augstci No-Drill Outdoor Security Camera Pole Mount pairs a metal 1/4-20 swivel-and-tilt ball mount with a slotted curved base plate and four stainless-steel worm-gear band clamps in multiple sizes. By threading a single clamp ordaisy-chaining two clamps together, the bracket wraps securely around round pipes, square 4×4 fence posts, or rectangular aluminum downspouts ranging from 2 inches up to 17 inches in diameter. Once the stainless bands are tightened with a screwdriver, you thread the Tapo C400 camera (or a 1/4-20 solar panel) onto the ball stud and lock the collar at your desired angle with zero drilling.
Best for: Zero-drill installations on gutter downspouts, porch pillars, driveway gate posts, and round poles from 2 to 17 inches wide.
Limitation: Holds one 1/4-20 device per bracket; order two units if you plan to strap both the Tapo C400 camera and its solar panel to the same pole at different heights.
Where to Mount the Tapo C400 and Solar Panel for Best Results
1. Mount 7 to 10 Feet High with a 15 to 20 Degree Downward Tilt
TP-Link engineers the Tapo C400’s passive infrared (PIR) motion sensor to perform best when mounted 7 to 10 feet (2.1 to 3 meters) above the ground and tilted downward at roughly 15 to 20 degrees. At that height, the 114-degree diagonal field of view captures a wide footprint of your driveway or porch while keeping the camera out of casual reach, especially since the C400 stores recordings locally on a microSD card inside the camera body.
Aim the camera so visitors or vehicles walk laterally across the frame rather than straight toward the lens. PIR sensors detect heat signatures moving across multiple detection zones much faster and more reliably than motion approaching head-on.
2. Keep the Camera Right-Side Up
When clamping the Tapo C400 to a gutter or mounting it near a soffit, always orient the ball joint so the camera body sits upright with the status LED and lens above the motion sensor. Because the Tapo C400 app menu does not provide a 180-degree image rotation switch, hanging the camera upside down results in inverted video and places the PIR sensor at the wrong angle relative to the ground. It also exposes the bottom rubber flap covering the USB-C charging port and microSD slot to downward-running rainwater.
3. Aim the Tapo C400 KIT Solar Panel South or Southwest
TP-Link’s companion solar panel needs only about 45 minutes of direct sunlight per day to keep the C400’s 5,200mAh battery topped off under normal trigger volume. In the United States, aiming the solar panel due south (or southwest for strong afternoon sun) at a 30 to 45 degree tilt produces the most consistent daily charge. Avoid placing the panel beneath tree branches or partial roof shadows; even a narrow shadow stripe across one section of a compact monocrystalline solar panel can cut charging current by more than half. For more tips on positioning small camera panels in shaded yards, see our solar panel mounts and placement guide.
4. Seal the USB-C Gasket and Form a Cable Drip Loop
When connecting the Tapo C400 KIT solar panel cord to the camera, press the molded waterproof silicone plug firmly into the bottom recess around the USB-C port until it sits completely flush. Leave a gentle downward U-shaped bend (a drip loop) in the cable just below the camera so rainwater drips off the bottom of the loop instead of running along the jacket directly against the charging seal. Remember that the Tapo C400 connects strictly to 2.4 GHz Wi-Fi, so test your live video stream at the mounting spot before securing the cable slack.
What Does Not Work with the Tapo C400
When shopping online for Tapo camera mounts, watch out for three accessory types that frequently show up in search results but will not work properly with the outdoor Tapo C400:
- Indoor peel-and-stick adhesive mounts for the Tapo C100 or C110: Search engines often surface adhesive wall pads designed for lightweight indoor Tapo cams. Those bases do not have a 1/4-20 screw, and peel-and-stick tape will fail outdoors under the weight of the C400’s battery when exposed to summer heat and rain.
- Proprietary slide-click brackets for Tapo PTZ cameras: Mounts built exclusively for motorized pan-and-tilt models like the Tapo C520WS and C510W or the solar Tapo C660 KIT use multi-screw plastic adapter plates rather than a center 1/4-20 stud. Stick with standard 1/4-20 threaded mounts for the C400.
- Third-party USB-C solar cables without a fitted gasket: Generic USB-C solar panels lack the molded rectangular silicone skirt that seals the bottom port opening on the Tapo C400. Using an unsealed USB-C plug outdoors allows moisture to corrode the charging pins and void water resistance.
Frequently Asked Questions
What thread size does the Tapo C400 mount use?
The Tapo C400, Tapo C400 KIT, and original Tapo C400S2 all use a standard 1/4-20 UNC female threaded socket on the back of the camera body. That is the same universal thread size used by standard camera tripods and most outdoor security camera brackets, including sibling models like the Tapo C402, C403, C410, C420, and C425.
Can I mount the Tapo C400 and Tapo C400 KIT without drilling holes?
Yes. Because the camera uses a standard 1/4-20 thread, you can clip it into horizontal vinyl siding with the Holicfun Vinyl Siding Mount, clamp it to a rain gutter with the Wasserstein or OkeMeeo 2-in-1 Gutter Mount, or strap it around a downspout or post with the Augstci Pole Mount without drilling a single hole into your exterior.
Can I mount the Tapo C400 upside down under an eave?
You can attach your mounting bracket to an eave, fascia, or gutter, but the Tapo C400 camera body itself must be oriented right-side up. The Tapo C400 does not have a 180-degree Invert Image setting in the Tapo app, and mounting the housing upside down flips your video feed while placing the bottom USB-C weather seal and PIR motion sensor in the wrong orientation.
How far can the Tapo C400 KIT solar panel be mounted from the camera?
The solar panel included in the Tapo C400 KIT (as well as the standalone Tapo A200 and Tapo A201 panels) comes with a 4-meter (13-foot) charging cable. That gives you up to 13 feet of reach to mount the camera in a shaded spot under an eave while placing the solar panel on a sunny gutter, extended wall arm, or south-facing siding seam.
Does the Tapo C400 have a magnetic base like the Tapo C425?
No. Unlike the Tapo C425 MagCam, the Tapo C400 does not have a magnetic base and cannot snap onto metal surfaces magnetically unless you thread an aftermarket 1/4-20 magnetic base into the rear socket. For outdoor security at 7 to 10 feet, a threaded mechanical clamp or siding hook provides a firmer hold against wind.
Bottom Line
Because TP-Link equipped the Tapo C400, Tapo C400 KIT, and Tapo C400S2 with a standard 1/4-20 threaded socket, you are never forced to drill holes into your siding or fascia to get a clean installation. If you are mounting on flat wood or masonry and do not mind drilling, the factory brackets in the box work well. For zero-drill setups, pick the Holicfun Vinyl Siding Mount for horizontal lap siding, the Wasserstein Gutter Mount for a single camera on a rain gutter, or the OkeMeeo 2-in-1 Gutter Mount to hang both the Tapo C400 KIT camera and its solar panel on one clamp. When roof overhangs shade your wall, pair the solar panel with the Holicfun Solar Panel Extension Mount, or strap your setup to a downspout or fence post with the Augstci No-Drill Pole Mount.
Comparing mounts for other TP-Link outdoor cameras? Check out our best Tapo C425 MagCam mounts guide, our Tapo C675D dual-lens solar mounts guide, and our general outdoor security camera mounts guide.