
Pulling harder is the biggest mistake people make with a stuck dash bracket, and it is usually what leaves a torn vinyl layer, a scratch, or a discolored patch behind. If you are searching for how to remove phone mount from dashboard trim without causing interior damage, the key is separating the mount removal from the glue cleanup.
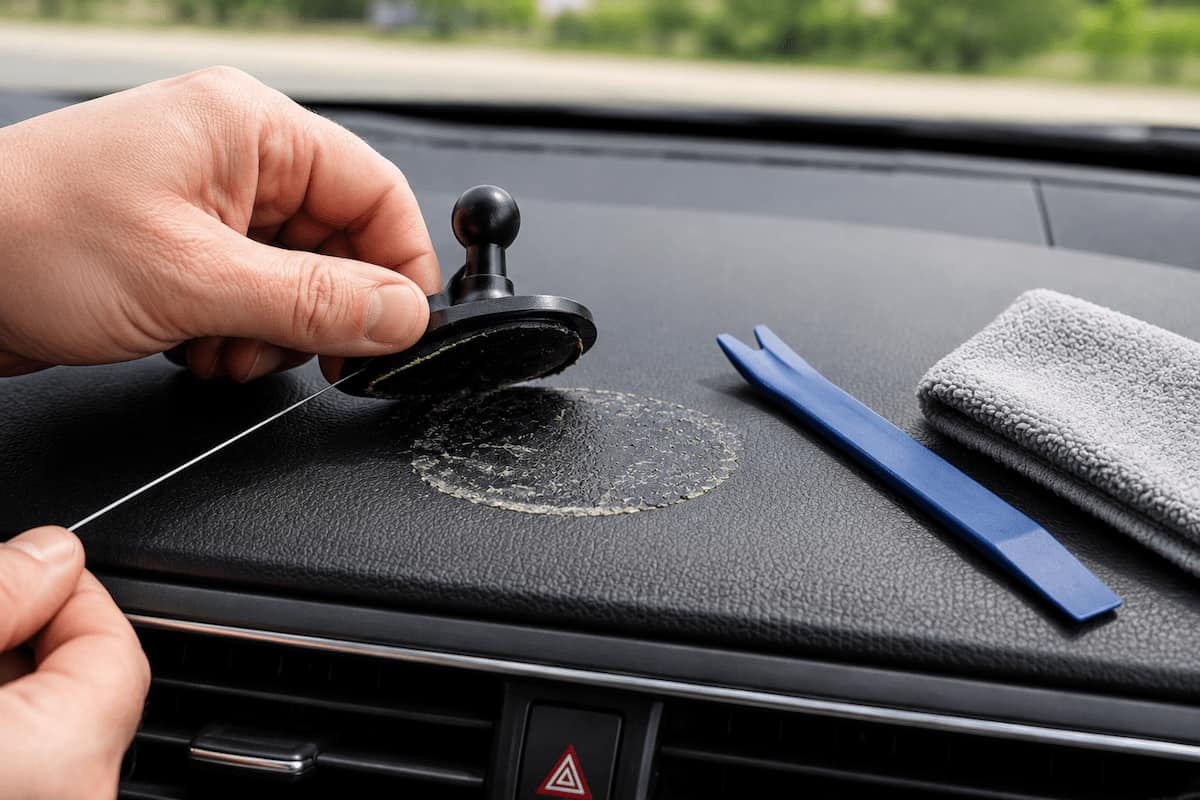
Quick Answer: Do not yank an adhesive phone mount or dashboard mounting disk straight off the dash. Warm the mounting pad gently with a hair dryer on low heat, then saw through the foam tape layer behind the base using dental floss or thin fishing line. Once the bracket is off, roll away the warm foam with your thumb before using an automotive-safe adhesive remover like Goo Gone Automotive on the remaining sticky film.
I have worked with car phone mounts for more than 20 years through MountGuys, and adhesive-backed bases have always presented the same catch: the better the tape holds over rough roads, the tougher it is to take off years later. Many dash mounts and suction-cup mounting disks use aggressive acrylic foam tape similar to 3M VHB. After summers of cabin heat, freezing winters, vibration, and constant tension, that bond can feel permanent. If you are replacing an old bracket rather than salvaging it, you can compare non-adhesive setups in our car phone mounts hub right after you finish cleaning the dash.
How to Remove Phone Mount From Dashboard Surfaces: Cleanup Supplies Compared
The method I use breaks the job into four calm stages: warm the adhesive, slice through the foam pad with floss, roll off the bulk of the tape by hand, and dissolve the leftover sticky film with an interior-safe cleaner. Here are the three cleanup products I use for the final residue and finishing steps.
| Product | Fits / Surface Role | Best For |
|---|---|---|
| Goo Gone Automotive Spray Gel | Clinging citrus gel for hard plastic and vinyl dash trim (not for leather) | Everyday sticky residue removal without runny liquid dripping into vents |
| 3M General Purpose Adhesive Cleaner | Professional solvent formula applied via microfiber cloth | Stubborn cured 3M VHB acrylic foam tape on durable hard surfaces |
| Meguiar’s Quik Interior Detailer | Non-greasy interior cleaner and UV protectant for plastic, vinyl, and screens | Removing solvent film and blending the cleaned spot with the rest of the dash |
Why Is It So Hard to Remove Adhesive From a Car Dashboard?
A dashboard phone mount has a tougher mechanical job than it appears. It has to hold a heavy smartphone steady through potholes, cornering forces, cabin temperature swings from below freezing to over 140 degrees Fahrenheit, and the outward pull of an extended mounting arm. To prevent mounts from falling off in traffic, manufacturers use high-strength acrylic foam tape, often 3M VHB (Very High Bond) or a similar closed-cell foam pad. Unlike a paper sticker, acrylic foam tape flows into the microscopic grain of your dashboard texture and cures stronger over time.
For removal, I always treat this as two separate jobs: first separate the plastic mount or mounting disk from the dashboard, and second remove the glue and foam residue left behind. Pulling harder on the mount arm tries to do both jobs at once, which concentrates all that upward force onto a small patch of vinyl or soft-touch coating.
Important: If an adhesive dash mount or mounting disk does not want to come off, do not increase your pulling force. Increase your patience. A little gentle heat from a hair dryer and five extra minutes with dental floss are much cheaper than repairing a lifted or torn dashboard skin.
What You’ll Need
You can remove an adhesive phone mount, dash cam base, or sticky dashboard pad with basic household and detailing supplies:
- Hair dryer (with low and medium heat settings)
- Waxed dental floss or thin monofilament fishing line (10-lb to 20-lb test)
- Plastic automotive trim tool, plastic razor scraper, or an old credit card
- Goo Gone Automotive Spray Gel or another dashboard-safe adhesive remover
- Clean microfiber cloths
- Mild dish soap and warm water for post-solvent wipe-down
- Meguiar’s Quik Interior Detailer for the final uniform finish
I strongly prefer a household hair dryer over a shop heat gun inside a vehicle cabin. A heat gun can blister vinyl, melt soft-touch coatings, or warp plastic trim in seconds, whereas a hair dryer gives you a wide margin for error. Likewise, stick exclusively to plastic tools around a dashboard and keep metal screwdrivers, steel putty knives, and metal razor blades out of the cabin.
Step 1: Warm the Adhesive Pad Gently
Start with your hair dryer on low or medium heat held 3 to 4 inches away from the base. Aim the airflow at the edge of the mounting pad and keep the nozzle moving continuously so you warm the adhesive layer gradually without overheating the surrounding dashboard. I normally warm the base for 30 to 60 seconds, then gently test the edge of the mount. Take extra care if the mount sits near a center infotainment touchscreen, digital gauge cluster, speaker grille, or stitched leather seam. The mounting base should feel warm to the touch like a car parked in the sun, never scorching hot.
Important: Dashboard construction varies dramatically across vehicle makes and generations. Hard molded ABS plastic, vacuum-formed vinyl skins, leather wraps, and rubberized soft-touch coatings all react differently to heat. Always use the minimum heat required to soften the foam core.
Step 2: Cut Through the Foam Adhesive Instead of Pulling Against It
Once the pad is warm, slip a piece of waxed dental floss or thin fishing line underneath one corner or edge of the mount base. Wrap the ends around your index fingers (or wear work gloves so the line does not bite into your skin) and use a slow, horizontal back-and-forth sawing motion. Your goal is to slice right through the middle of the soft foam tape layer rather than ripping the adhesive away from the dashboard grain.
If the base sits too flush to slide the floss underneath right away, gently wedge the tip of a plastic trim tool or an old credit card under one edge just enough to start a gap, then feed the floss behind that lifted corner. If the line binds up halfway across, stop pulling and warm the pad with the hair dryer for another 20 seconds. Do not worry if half of the gray or black foam pad stays stuck to the dashboard when the plastic bracket comes free; getting the rigid mount body off safely is what prevents the dashboard surface from stretching or puckering.
Step 3: Roll Away Bulk Adhesive Without Chemicals
With the plastic mount out of the way, inspect what remains on the dash. Often you will see a layer of split foam tape or a thick gel ring. Before reaching for a chemical solvent, remove as much bulk material as you can mechanically while the adhesive is still warm.
Press your thumb firmly against the outer edge of the warm foam tape and roll it inward toward the center of the pad. Warm acrylic foam tape usually balls up and peels out of the dashboard grain cleanly when rolled rather than scraped. You can also use the edge of an old credit card or a plastic trim wedge on thicker foam chunks. The less foam left on the dash, the less chemical solvent you will need in Step 4.
Step 4: Dissolve Remaining Glue Residue With Goo Gone Automotive
For the thin, tacky glue film left behind after rolling off the foam pad, Goo Gone Automotive Spray Gel is what I personally use. Unlike thin liquid solvents that immediately run downhill into dashboard seams, button bezels, and air vents, the Spray Gel clings to vertical and sloped dash surfaces right where you apply it.
Dab a small amount of gel onto the residue (or apply it to a folded microfiber cloth first for tight spots near screens), let it dwell for 2 to 3 minutes so it softens the adhesive, and wipe gently in circular motions with a clean microfiber towel. If a stubborn ring remains, repeat with a second light application rather than scrubbing hard. Keep all solvents away from electronic switches, instrument cluster lenses, and open seams.
Important: Always test any adhesive remover on a hidden lower edge of the dashboard trim first. Goo Gone Automotive Spray Gel is formulated for automotive plastics and vinyl dashboards, but the manufacturer states not to use it on leather. If your vehicle has a leather-wrapped dashboard or delicate suede trim, skip citrus solvents and follow your vehicle manufacturer’s leather care guidelines.
Professional Alternative: 3M General Purpose Adhesive Cleaner
When a commercial fleet bracket, heavy tablet base, or dash cam pad has baked onto a hard plastic dash for several years, 3M General Purpose Adhesive Cleaner is the heavy-duty detailing alternative. It is a specialized solvent blend designed specifically to break down cured 3M acrylic tape and stubborn sticky glue residue.
Because it is stronger and thinner than a citrus gel, I treat it as a secondary option for tough jobs rather than my everyday first reach. Never spray it directly across the dashboard. Instead, dampen a corner of a clean microfiber cloth, test a hidden spot under the dash lip first, and blot the adhesive residue until it releases.
Step 5: Clean and Blend the Dashboard With Meguiar’s
Wiping off the sticky glue is not the final step. Any adhesive remover will leave an oily or shiny film behind, and your hands will have left smudges around the work area. First, wipe the spot with a microfiber cloth dampened with mild soapy water, then dry it with a clean towel so no active solvent remains on the plastic.
For the finishing pass, I use Meguiar’s Quik Interior Detailer. Wipe down the entire surrounding panel of the dashboard rather than just the 3-inch circle where the mount sat. Treating the whole section evens out the matte sheen so you do not end up with one bright clean square in the middle of a dusty dashboard.
How to Remove a Suction Cup Dashboard Pad or Sticky Gel Base
Many drivers run into trouble when removing a two-piece dashboard suction setup, where a sticky gel suction cup locks onto a round plastic adhesive disk stuck to the dash. As I covered in my iOttie Easy One Touch 6 hands-on review, mounts of this style combine a reusable gel vacuum cup with a semi-permanent acrylic foam dashboard pad designed to bridge textured dash grain.
- Step A (Release the suction cup mount from the disk first): Flip the locking lever up on the base of the mount to release the vacuum seal. Pull up on the rubber release tab on the edge of the suction cup (or slide a plastic credit card under the gel rim after warming it slightly) so the mount separates from the round disk. Never use the telescoping arm as a pry bar to rip the adhesive disk off the dash.
- Step B (Remove the round adhesive dashboard pad): The plastic mounting disk uses a strong 3M-style acrylic foam backing. Warm the disk for 30 to 45 seconds with a hair dryer on low heat, then saw behind the disk with waxed dental floss using the exact Step 2 technique above. Roll off the warm foam backing with your thumb and clean any leftover ring with Goo Gone Automotive.
- If you stuck a sticky gel suction cup directly to the dash: When a gel-bottom suction cup is attached directly to a smooth dashboard without a plastic disk, summer heat can make the gel bond tightly. Release the lever, warm the rubber skirt gently with a hair dryer, and work a damp microfiber corner or plastic card under the edge of the cup to break the seal. You can rinse a sticky gel suction cup under warm tap water and let it air-dry to restore its grip for future use.
If you want to understand when you need a mounting disk versus direct suction, or how to use a weighted friction base that leaves zero glue behind, see our guide on how to make a suction cup mount stick to a dashboard.
Why Is There a Lighter or Darker Spot Where the Mount Was?
Sometimes you remove every trace of glue, clean the surface thoroughly, and still see a faint circle or square that does not quite match the rest of the dashboard. In most cases, that contrast is not chemical damage. If the phone mount or adhesive disk sat in that spot for two or three years, the covered patch was shielded from direct UV sunlight, interior dressings, and everyday wear while the rest of your dashboard aged around it. On some soft-touch or foam-backed vinyl dashboards, heavy downward pressure from a suction lever can also leave a slight compression ring. Conditioning the entire dash panel evenly with an interior detailer softens the visual contrast, and minor foam indentations often relax after a few warm days parked in the sun.
What If the Adhesive Mount Still Won’t Budge?
Some foam-taped mounts become remarkably stubborn after baking through several summers under a windshield. If your mount barely flexes when you test it, do not respond by prying harder with a tool. Follow this slower cycle instead:
- Warm the mounting pad again for 45 seconds with a hair dryer on low or medium heat.
- Use a plastic trim wedge to lift just 1 to 2 millimeters of the outer foam edge.
- Tuck a doubled-up strand of waxed dental floss or 15-lb fishing line into that tiny gap.
- Saw slowly side to side while pulling parallel to the dashboard surface, never upward.
- Stop and reapply 20 seconds of gentle heat every time the floss encounters stiff resistance.
Slicing a thick VHB pad in three or four warm stages takes an extra five minutes, but it keeps upward pulling forces off your dashboard skin.
Be Extra Careful With Textured, Soft-Touch, and Leather Dashboards
A smooth, hard molded plastic trim panel is the most forgiving surface to clean. Textured dashboards require gentler work because foam adhesive settles down into the pebble grain. Scraping hard across textured vinyl with even a plastic card can burnish the high points of the grain and leave a shiny flat spot that is more noticeable than the glue was. Instead, let the gel remover dwell for a few minutes and blot or brush lightly with a microfiber towel.
Soft-touch dashboards also deserve extra caution. Many modern interiors apply a thin rubberized matte coating over hard plastic that aggressive rubbing or harsh solvents can peel. Use minimal pressure, test your cleaner on an unseen edge first, and avoid Goo Gone Automotive Spray Gel on real leather dashboards.
What I Would Never Use to Remove Dashboard Glue
You will see plenty of household shortcuts recommended on forums that work fine on glass windows but ruin automotive dashboard plastics. Keep these items away from your dash:
- Metal razor blades or box cutters
- Metal putty knives or flathead screwdrivers
- Acetone or nail polish remover (melts and whitens ABS plastic and vinyl)
- Lacquer thinner, brake cleaner, or aggressive paint solvents
- Magic Eraser melamine sponges (act like ultra-fine sandpaper and dull the dash finish)
- High-temperature shop heat guns
Modern dashboards combine painted plastics, textured vinyl, rubberized coatings, and stitched wraps. Your goal is not merely getting the glue off; it is removing the mount without leaving permanent proof that it was ever there.
How to Avoid Adhesive Headaches With Your Next Phone Mount
If cleaning off cured 3M tape has convinced you never to stick another adhesive pad directly onto your dashboard, you have several clean alternatives depending on your cabin layout.
1. Switch to a Windshield or Reusable Suction Cup Mount
Tempered windshield glass is nonporous, handles heat without deforming, and cleans up in seconds. If your state permits windshield mounting or your dash has a smooth trim panel that accepts direct suction without an adhesive disk, compare the top performers in our best suction cup phone mounts guide, or pair your suction mount with a weighted portable friction beanbag pad that lifts off the dash with zero residue.
2. Use a Vehicle-Specific Direct-Fit Bracket
Many vehicle-specific phone mounts clip onto factory trim seams, center console bezels, or infotainment screen housings without relying on a large adhesive pad on top of the dash. Browse our car phone mounts by vehicle directory to see custom-fit brackets for your exact make, model, and year.
3. Use a Stabilized Air Vent or MagSafe Mount
A well-engineered air vent mount skips adhesive altogether and transfers between vehicles in under a minute. Our Andobil air vent mount review shows how a wider stabilizer plate keeps a vent holder steady, and our best MagSafe car mounts roundup covers one-handed magnetic options for iPhone and Android drivers.
Can You Reuse the Phone Mount After Removal?
Yes, you can almost always reuse the phone mount itself, just not the split foam adhesive pad. If you are moving an adhesive-base mount to another vehicle, peel the remaining foam off the bottom of the plastic base and apply a fresh 3M VHB replacement pad. If you are moving a gel-bottom suction mount, wash the sticky gel suction cup with warm water, let it air-dry, and install a fresh adhesive dashboard disk only if your next car has a textured dash.
Frequently Asked Questions
How do you remove a phone mount from a dashboard without damaging it?
Warm the adhesive base gently for 30 to 60 seconds with a hair dryer on low heat, then saw horizontally behind the mount with waxed dental floss or thin fishing line to slice through the foam tape layer. Once the plastic bracket is off, roll the warm foam off with your thumb and clean any remaining sticky film with an automotive-safe adhesive remover.
How do you remove 3M VHB adhesive tape from a car dashboard?
Start with gentle heat from a hair dryer to soften the acrylic core. Use fishing line or dental floss to cut through the foam layer, then use your thumb to roll the warm tape into small balls out of the dash texture. Apply Goo Gone Automotive Spray Gel or 3M General Purpose Adhesive Cleaner on a microfiber cloth only for the thin tacky residue left behind.
How do you remove a sticky suction cup dashboard pad?
First unlatch the suction lever and remove the phone mount arm from the round plastic disk so you are not pulling on the arm. Next, warm the round adhesive dashboard pad with a hair dryer for 30 to 45 seconds, slide dental floss or a thin plastic card underneath one edge, and saw slowly through the foam backing before wiping away any leftover residue.
Can I use Goo Gone on a car dashboard?
Yes, Goo Gone Automotive Spray Gel is specifically made for automotive interiors including hard plastic and vinyl dashboards, though you should always test a hidden spot first and wipe the area with mild soapy water afterward. Never use Goo Gone Automotive Spray Gel on real leather dashboards.
Can I use rubbing alcohol to remove glue from a car dashboard?
Isopropyl rubbing alcohol on a cotton swab can help loosen the edges of an adhesive disk or light sticky residue, but repeated scrubbing with strong alcohol can dry out or dull certain painted plastics, vinyls, and soft-touch coatings. Always test a hidden corner first, and use a dedicated automotive adhesive gel for thicker glue residue.
Can I use a razor blade on dashboard adhesive?
No. A metal razor blade will almost certainly gouge or slice into textured vinyl, painted trim, or soft-touch dashboard coatings. Stick to dental floss, fishing line, an old credit card, or a plastic automotive trim tool.
The Bottom Line
After more than two decades working with vehicle mounts, the biggest mistake I see drivers make is treating adhesive removal as a test of strength. Heat the pad gently, saw through the foam layer with dental floss, roll off the bulk tape with your thumb, and let Goo Gone Automotive Spray Gel or 3M Adhesive Cleaner handle the final film before blending the panel with Meguiar’s Quik Interior Detailer.
If you are also removing or relocating other dashboard gear, check out our guide to radar detector dash mounts, read our iOttie Easy One Touch 6 hands-on review, or compare no-residue alternatives in our dashboard suction cup mount guide.