
Using Starlink in a car can provide internet in places where cellular coverage disappears, and the compact Starlink Mini makes it practical in an ordinary sedan or SUV. The harder questions are whether it will work through the vehicle’s glass, whether it can stay connected while driving and how to mount and power it safely.
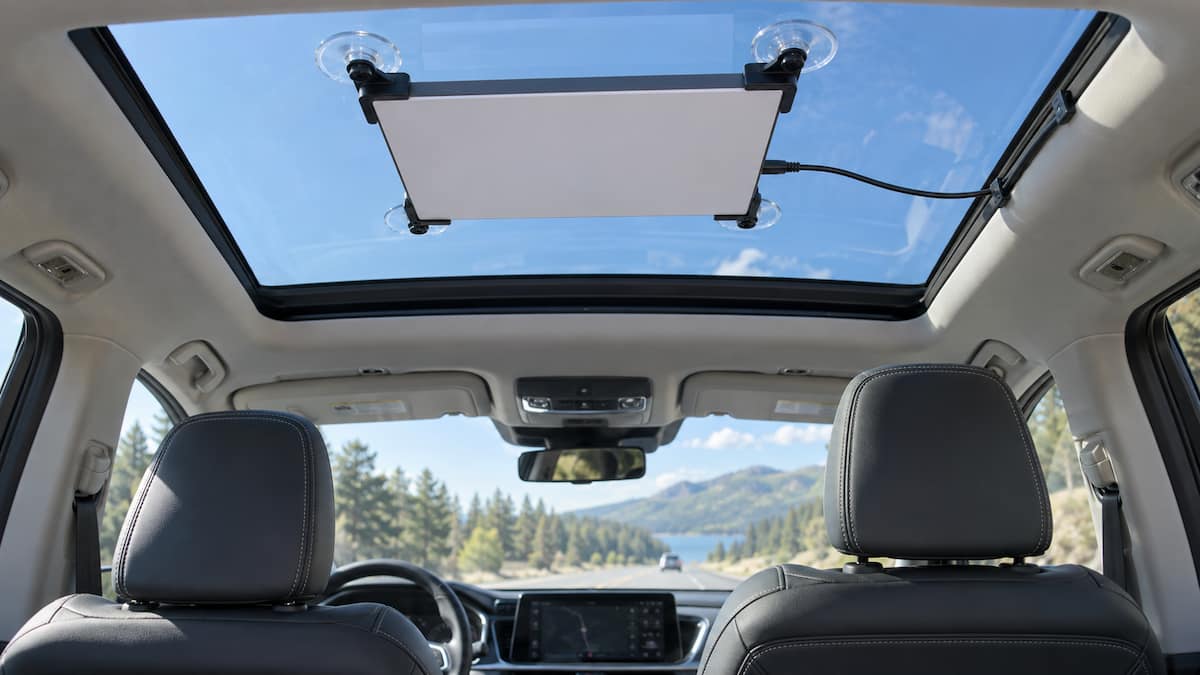
The cleanest interior installation is normally beneath a panoramic glass roof or sunroof, where the antenna can face upward without blocking the driver’s view. A windshield or rear-window installation can also work in some vehicles. This guide explains where an inside mount works, what can interfere with reception and how to power the Mini without repeated restarts.
If you are still deciding whether an interior installation is right for your vehicle, our complete Starlink mounts guide covers interior, roof-rack, magnetic, RV, boat and permanent mounting options.
Table of Contents
Will Starlink in a Car Work Through the Glass?
Yes, the Mini can establish a connection through ordinary automotive glass because the glass itself is not always a complete barrier to the antenna signal. The larger issue is how much sky remains visible from the chosen position. A panoramic roof gives the dish a much wider view than a steep windshield surrounded by a metal roof, pillars and overhead console.
Performance will vary by vehicle. Some modern windshields and roof panels use metallic tint, low-emissivity coatings or infrared-reflective layers. Those treatments can weaken satellite reception even though the glass looks clear. Rear windows also contain defroster grids, and the roof around them may block a large portion of the sky.
The Starlink app is the best way to evaluate a proposed location. Park in an open area, place the Mini where you intend to mount it and use the obstruction tool before attaching anything. Test for at least several minutes rather than assuming that an initial connection means the location will remain stable.
Best Places to Mount Starlink Mini Inside a Car
The best location depends more on the vehicle’s glass and roof design than on the size of the cabin. Start with the panoramic roof if you have one, then test the upper windshield or rear glass. Avoid treating the dashboard as the default simply because it is easy to reach.
Under a Panoramic Roof or Sunroof
This is generally the strongest interior option. The Mini can lie close to horizontal, face the sky and remain out of the driver’s forward sight line. A purpose-built frame with multiple suction cups spreads the load across the glass and prevents the dish from sliding when the vehicle turns or stops.
Leave enough clearance for the power connector and do not operate the sunroof while the mount is installed. The factory shade may also need to remain open. If the shade presses against the Mini or its cable, move the mount rather than forcing the shade closed.
Upper Windshield
A windshield mount can work when the glass has a broad view of the sky and the dish can be positioned without obstructing the driver. The more horizontal the antenna sits, the better its view will generally be. A steep windshield installation may force an awkward angle and place more of the metal roof in the signal path.
Keep the mount outside the swept area needed for safe visibility and away from camera housings, sensors and the passenger-side airbag path. Check your state’s rules before using any large windshield-mounted accessory.
Rear Window or Rear Glass Roof Section
Rear glass can be useful in hatchbacks, SUVs and vehicles with large sloped back windows. It keeps the equipment away from the driver and may provide a workable view overhead. Defroster grids, dark metallic tint and a sharply sloped window can reduce performance, so test before committing to the position.
Loose on the Dashboard
This may be acceptable for a stationary test while parked, but it should not be treated as a travel installation. The Mini can slide, block forward visibility and become dangerous during a hard stop. Dashboard heat is another concern, particularly when sunlight is concentrated through the windshield.
Recommended Interior Mounts and Power
| Mount or Accessory | Best For | Installation Location |
|---|---|---|
| Spigen Rattleproof Car Mount Kit | Best overall interior mount | Panoramic roof, sunroof or large glass panel |
| SPASTACISE Starlink Mini Suction Cup Mount | Newer sunroof option with spare suction cups | Panoramic roof, sunroof or large glass panel |
| FONKEN Starlink Mini Car Mount | Adjustable dashboard or windshield positioning | Dashboard or windshield, when legal and unobstructed |
| JOYROOM Starlink Mini Car Adapter | Powering the Mini from a vehicle socket | 12V or 24V accessory outlet |
Spigen Rattleproof Car Mount Kit
The Spigen mount is the strongest all-around choice for an interior installation beneath a sunroof or panoramic roof. Its dedicated frame surrounds the Starlink Mini, while four suction points distribute the load across the glass. The quick-release design also makes it easier to remove the dish when parking or moving it between vehicles.
This mount makes the most sense when the roof glass is broad enough to accommodate the frame without contacting the headliner, overhead console or retractable shade. Clean the glass and suction cups carefully before installation. After locking the cups, pull on the frame by hand and recheck every cup before driving.
SPASTACISE Starlink Mini Suction Cup Mount
The SPASTACISE mount is another purpose-built choice for attaching the Mini beneath a sunroof or panoramic glass panel. Its biggest practical advantage is the inclusion of two spare suction cups. Suction hardware eventually hardens, wears or becomes damaged through repeated removal, so having replacements in the package makes this a sensible option for travelers who expect to install and remove the mount frequently.
The mount installs without tools and keeps the antenna close to the roof glass, preserving passenger headroom better than a long articulated arm. It is a newer product with a shorter track record than the Spigen, which is why the Spigen remains our first choice. However, the SPASTACISE is a worthwhile alternative when replaceable suction hardware matters more than an established brand history.
FONKEN Starlink Mini Car Mount for the Dashboard
The FONKEN mount is the more flexible choice when an overhead glass installation is not available. It is designed to position the Mini on a dashboard or windshield and gives you more control over the dish angle than a flat frame mounted directly against the glass.
That flexibility comes with more responsibility. The assembly and dish occupy substantial space compared with a phone mount, so verify that the chosen position does not intrude into the driver’s required sight line. It is best suited to large dashboards, vans, trucks and vehicles with expansive windshields rather than compact cabins.
How to Power Starlink Mini in a Car
Mounting is only half of the installation. The Mini also needs a stable power source. Starlink’s published Mini specifications call for a 100W USB Power Delivery source capable of 20V at 5A when used with the official USB-C-to-barrel-jack cable. Many factory USB-C ports are intended for phones and do not provide that level of output.
A 12V-to-30V step-up adapter is usually the simplest solution when the vehicle has an ordinary accessory socket. The JOYROOM adapter converts 12V or 24V vehicle input to a dedicated 30V output for the Mini. It also adds a digital voltage display and two USB charging ports, which is useful when the dish, a phone and a passenger device all need power during the same trip.
We tested the JOYROOM adapter in an SUV and found that it stayed securely seated, powered the Mini without dropouts during our testing and continued charging other devices. Read our hands-on JOYROOM Starlink Mini Car Adapter review for the full results.
Before buying another adapter, check whether your vehicle already has a genuine 100W USB-C PD outlet. The wattage should be listed in the owner’s manual or next to the port. A port merely labeled USB-C is not enough. For additional plug-in, long-cable and permanent-install choices, see our Starlink Mini car adapter guide.
Can You Use Starlink in a Moving Car?
Starlink’s current Roam documentation permits in-motion use with eligible service, subject to local restrictions. Its terms also state that undesignated equipment, plans and uses are prohibited on moving vehicles. In other words, a successful connection does not by itself mean every kit-and-plan combination is authorized for use while driving.
Check your current plan in the Starlink account before relying on the connection in motion. Starlink’s current Fair Use Policy states that Roam Unlimited service can be used in motion up to 100 mph. Plans and service terms can change, so verify the current policy rather than relying on an old forum post.
The driver should never adjust the dish, troubleshoot the app or work on a connected device while the vehicle is moving. Treat Starlink as passenger connectivity unless the system is fully installed and requires no driver interaction.
How to Install an Interior Starlink Mini Mount
- Test the location first. Park in an open area and use the Starlink app’s obstruction tool at the proposed mounting point.
- Inspect the glass. Look for tint film, heating elements, cracks or coatings that may affect reception or suction.
- Clean both surfaces. Remove dust, skin oils and cleaner residue from the glass and suction cups.
- Attach the empty mount. Lock every suction cup and pull firmly on the frame before inserting the Mini.
- Install the dish and cable. Confirm that the Mini is fully seated and that the power connector is not under sideways pressure.
- Secure the cable. Keep it away from pedals, seat tracks, airbags, sunroof mechanisms and sharp trim edges.
- Test while parked. Confirm stable power, check obstructions and monitor the connection before attempting travel use.
- Recheck regularly. Heat cycles and dust can weaken suction. Test each cup before a trip and remove the mount if any cup will not hold.
If a suction cup begins releasing, our guide to fixing a suction cup mount that falls off covers cleaning, cup wear and surface problems in more detail.
Heat, Tint and Other Problems to Watch
Cabin Heat
A closed vehicle can become much hotter than the outside air. Direct sunlight through roof glass adds more heat around the Mini and its mount. Do not leave the system running unattended in a parked vehicle, and remove it if the cabin is approaching the equipment’s operating limit. Excessive heat can also shorten suction-cup life.
Metallic Window Tint
Dyed or ceramic tint is not the same as metallic tint. A film or factory coating containing metal can interfere with radio signals. If the Mini works outside but performs poorly beneath the glass, the window construction may be the cause.
Partial Sky View
A connection may appear stable while parked and then encounter repeated obstructions as the vehicle changes direction. Roof pillars, trees, buildings and terrain all alter the visible sky. Interior mounting prioritizes security and convenience, but an exterior roof mount generally gives the Mini a cleaner view.
Weak or Intermittent Power
Vehicle accessory outlets can switch off during engine stop-start events or when the ignition changes modes. Loose plugs and undersized adapters can also produce restarts that look like signal failures. Check the Mini’s power history before blaming the glass or mount.
Is an Interior Mount Better Than an Exterior Mount?
An interior mount is better for quick removal, theft resistance and avoiding wind exposure. It does not require cable routing through a door or body opening, and it keeps the equipment protected from rain, branches and road debris.
An exterior mount is better for signal quality because the Mini has an unobstructed view of the sky. It is also the better path for permanent or frequent in-motion use when installed with hardware designed for highway loads. Trucks with steel roofs can use magnetic systems, while vehicles with crossbars can use roof-rack clamps. Our guide to Starlink mounts for trucks covers those options.
For occasional road trips and remote work sessions, an interior sunroof mount is often the most convenient compromise. For daily use where uninterrupted service matters, an exterior vehicle-rated installation is the more dependable solution.
Frequently Asked Questions
Does Starlink Mini work through a panoramic roof?
It often does when the roof provides a broad view of the sky and does not contain a signal-blocking metallic coating. Test the exact location with the Starlink app because visually similar roof glass can perform differently between vehicles.
Can I put Starlink Mini on my dashboard?
You can test it there while parked, but the Mini should be secured in a purpose-built mount before travel. It must not block the driver’s view or sit in an airbag deployment area.
Will tinted windows block Starlink Mini?
Some tint will have little effect, while metallic or infrared-reflective tint may reduce or prevent a usable connection. If reception improves immediately when the Mini is moved outside, the glass or tint is likely contributing to the problem.
Can Starlink Mini run from a car USB-C port?
Only if the port meets the required USB Power Delivery specification. Starlink specifies a 100W source capable of 20V at 5A when using its USB-C-to-barrel-jack cable. Many factory ports provide far less power.
Will Starlink Mini work while the car is moving?
It can work in motion with eligible equipment and service, but you must confirm that your current Starlink plan permits it and follow local restrictions. The dish must also be secured in a mount designed for vehicle use.
Why does my Starlink Mini keep restarting in the car?
Insufficient or unstable power is a common cause. Verify the adapter output, the vehicle socket, cable connections and whether the outlet switches off when the ignition or stop-start system changes state.
Related Mount Guides
- Starlink Mounts for RV, Boat, Home and Truck
- Starlink Mini Car Adapters
- Starlink Mounts for Trucks
- Starlink Mounts for Overlanding
Phone Mount Guides
Once the Mini is secured and powered, keep the phone running the Starlink app somewhere visible without interfering with the dish. Browse our vehicle phone mount guides for custom and universal mounting options by make and model.