
Choosing the right Insta360 motorcycle mount requires solving a mechanical problem that standard action cameras never face: lever-arm torque. While a conventional helmet camera sits flush against a curved adhesive pad, 360-degree cameras like the Insta360 X6, X5, X4, and X3 are frequently mounted on the end of a 100cm to 120cm Invisible Selfie Stick or elevated above the handlebars to capture unobstructed spherical video. At 65 mph, aerodynamic drag against a 200-gram camera at the end of a three-foot extension pole acts like a pry bar, causing ordinary single-ball mounts to droop and plastic two-prong tabs to snap cleanly at the base. Whether you want a cockpit handlebar clamp, a bolt-on rear tail frame setup for third-person drone-style views, or a curved helmet adhesive rig, your hardware must match the exact tube diameter and vibration profile of your motorcycle.
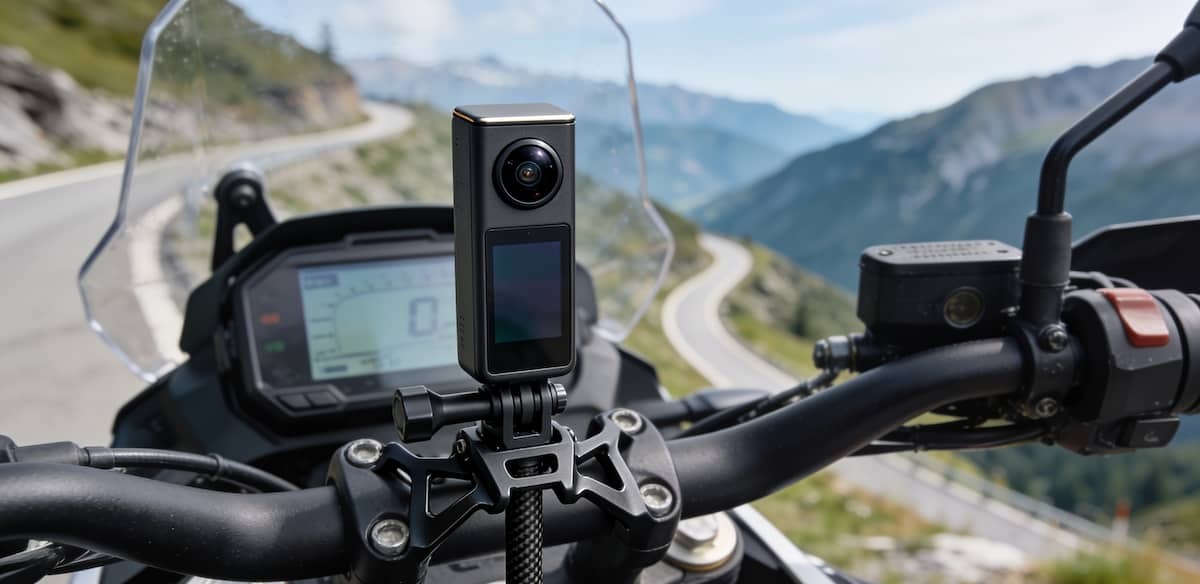
Quick Answer: For most riders, the refreshed Insta360 Motorcycle Bundle (V2) is the best all-around package because it pairs the redesigned ball-less Heavy Duty Clamp (for 17mm to 37mm handlebars and crash bars) with two curved 3M Flexible Adhesive Mounts for helmets, fuel tanks, and fairings. If you plan to run an extended Invisible Selfie Stick off a rear passenger peg bracket or frame tube, choose the Insta360 Motorcycle U-Bolt Mount or the quick-release PGYTECH CapLock U-Bolt Mount, and always anchor long extension poles at a second contact point on the bike.
This guide is part of our camera mounts hub and our motorcycle mounts hub, where we break down hardware fitment by handlebar diameter, frame geometry, and device weight.
Best Insta360 Motorcycle Mounts Compared
The table below compares the five most reliable mounting systems for the Insta360 X6, X5, X4, X4 Air, X3, ONE RS, and Ace Pro 2, separating multi-mount bundles from dedicated U-bolt bases and quick-release claw clamps.
| Mount | Best For | Years / Trim |
|---|---|---|
| Insta360 Motorcycle Bundle (V2 with Ball-Less Heavy Duty Clamp) | Complete multi-position kit for handlebars, crash bars, helmets, and fuel tanks | 17mm to 37mm round bars + curved helmets/bodywork; fits Insta360 X6, X5, X4, X3 & Ace Pro 2 |
| Insta360 Motorcycle U-Bolt Mount (CINSAAVZ) | Semi-permanent bolt-on stability for rear passenger peg brackets and handlebars | 13mm to 32mm round frame tubes and bars; includes 1/4-20 adapter for Invisible Selfie Sticks |
| Insta360 Heavy Duty Clamp Mount (Standalone CINSBAVS) | Riders who only need the wrench-locked handlebar and engine guard claw clamp | 17mm to 37mm (0.67-inch to 1.45-inch) round bars; zero-ball-joint fixed-axis design |
| PGYTECH CapLock Action Camera U-Bolt Mount | One-button quick-release camera removal at fuel stops with geared rosette locking | 12.7mm to 33mm (0.5-inch to 1.3-inch) round tubes; includes 1/4-20 and 3-prong quick plates |
| PGYTECH CapLock Action Camera Super Clamp Mount | Fast tool-free transfers between handlebars, windscreens, and secondary stick braces | 17mm to 37mm round tubes and flat edges; aluminum rosette arm with dual-lock CapLock base |
Important: Never suspend an extended 100cm to 120cm Invisible Selfie Stick from plastic two-prong action-camera fingers at highway speed. Always thread an extended selfie stick directly onto a metal 1/4-20 male stud, use the reinforced Insta360 Action Invisible Selfie Stick, and add a secondary support clamp mid-shaft when riding above urban speeds.
1. Insta360 Motorcycle Bundle (V2)
When riders search for the official Insta360 motorcycle bundle, it is critical to distinguish the first-generation kit from the redesigned second-generation bundle (SKU CINSAAVY). The original V1 kit relied on a double-ball magic arm that frequently slipped downward when subjected to wind drag on naked bikes or high-rpm engine vibration. Insta360 solved that failure point in the V2 bundle by replacing the ball joint entirely with the Heavy Duty Clamp, a single-axis worm-gear claw that locks its tilt angle mechanically.
Inside the box, you receive the Heavy Duty Clamp Mount, two Flexible Adhesive Mounts with pre-applied 3M VHB pads, eight rubber anti-slip spacer rings, two 1/4-20 to 2-prong adapters, one 3-prong to 1/4-20 adapter, three thumb screws, a hex key, and a dedicated leverage wrench for the clamp knob. Because the Flexible Adhesive Mounts use a bendable TPU base rather than rigid plastic, they conform to curved motorcycle fuel tanks, sportbike tail cowls, windscreens, and full-face helmet shells without leaving air gaps around the perimeter.
- Best for: Riders who want both a rock-solid handlebar or crash-bar clamp and curved adhesive mounts for helmet, tank, or fairing angles in one package.
- Clamping range and weight: Fits round tubes from 17mm to 37mm (0.67 to 1.45 inches) using the included rubber sizing rings; the Heavy Duty Clamp weighs 272 grams (9.6 ounces).
- Key installation rule: On smooth chrome or gloss-painted handlebars, tighten the main claw using the included crescent wrench rather than bare fingers so the clamp cannot rotate under wind load.
2. Insta360 Motorcycle U-Bolt Mount
If your goal is capturing third-person chase footage or leaving a dedicated mounting base bolted to your frame all season, the Insta360 motorcycle U-bolt mount (model CINSAAVZ) is stronger and lower-profile than any quick-release claw clamp. Instead of relying on side-jaw friction, a stainless steel U-bolt wraps around your handlebar, rear passenger footpeg bracket, or trellis frame tube and locks down with dual nylock nuts and spacers.
The refreshed version of the Insta360 U-Bolt Mount replaces the older exposed ball stud with a gimbal-style swiveling metal collar. This design lets you bolt the U-bolt onto an angled tube (such as a swept-back passenger peg hanger or crash cage bar) and still level the 1/4-20 mounting stud or 3-prong adapter horizontally and vertically. Once torqued down with the included wrench, the zinc and aluminum alloy housing resists twisting even on rough backroads and adventure trails.
- Best for: Semi-permanent installation on handlebars, rear passenger footpeg brackets, and tubular frame rails where a bulky claw clamp will not fit.
- Tube diameter fitment: Fits 13mm to 32mm (0.51 to 1.26 inches) round tubing using two included protective plastic spacer inserts that prevent bar scratching.
- Selfie stick pairing: Includes both a 3-prong action mount adapter and a direct 1/4-20 screw adapter designed specifically for the Insta360 Action Invisible Selfie Stick.
3. Insta360 Heavy Duty Clamp (Standalone)
Many riders already own adhesive helmet mounts and only want the upgraded bar clamp from the V2 bundle. Purchasing the standalone Insta360 Heavy Duty Clamp (model CINSBAVS) gives you the exact same ball-less CNC aluminum and steel claw without paying for extra sticky pads. By eliminating the spherical ball head, this clamp removes the primary pivot point where heavy 360 cameras sag on bumpy pavement.
You can mount an Insta360 X6, X5, X4, or X3 directly to the top of the clamp for a clean cockpit view showing your instrument cluster, hands, and the road ahead, or thread a 1/4-20 Action Invisible Selfie Stick onto the stud. Keep in mind that because the clamp lacks a ball joint, it only pivots along a single fore-and-aft plane once clamped to a bar. You must clamp it onto a relatively horizontal section of your handlebar or engine guard to keep the camera or stick upright, though 360 reframing software automatically levels the horizon in post-production.
- Best for: Cockpit handlebar mounting and engine-guard clamping when you do not need adhesive helmet pads.
- Bar compatibility: Grips round bars from 17mm to 37mm (covering 7/8-inch standard bars, 1-inch cruiser bars, 1-1/8-inch tapered fatbars, and 1.25-inch highway bars).
- Included hardware: Comes with the Heavy Duty Clamp body, four pairs of anti-slip rubber spacers, a 3-prong to 1/4-20 adapter, a thumb screw, and the tightening wrench.
4. PGYTECH CapLock Action Camera U-Bolt Mount
Unthreading a 360 camera from a 1/4-20 stud or pulling a thumb screw every time you stop for gas or walk into a restaurant gets tedious fast. The PGYTECH CapLock U-Bolt Mount solves that daily friction while maintaining all-metal rigidity. PGYTECH is a major precision-machining partner in the action-camera space, and their U-bolt bracket replaces smooth friction balls with an internal geared rosette joint that provides 360-degree horizontal rotation and 180-degree vertical tilt locked by a single aluminum wing knob.
At the top of the arm sits PGYTECH’s patented CapLock quick-release socket. You thread the compact square 1/4-20 CapLock plate onto the base of your Insta360 camera, press it straight down into the mount until it clicks, and flip the secondary safety lock lever so the release button cannot be depressed accidentally by vibration or road debris. When you park the motorcycle, flipping the safety lock and pressing one button detaches the camera in two seconds.
- Best for: Riders who commute, tour, or make frequent stops and want instant one-button camera removal combined with a bolted U-bolt base.
- Tube fitment and load rating: Fits 12.7mm to 33mm (0.5 to 1.3 inches) handlebars and rear peg tubes using two included cushion blocks; rated for dynamic action-camera loads up to 350 grams.
- Dual interfaces included: Ships with both a 1/4-20 threaded CapLock quick-release plate and a 3-prong action-camera CapLock plate in the box.
5. PGYTECH CapLock Action Camera Super Clamp Mount
If you ride multiple motorcycles, rent bikes when traveling, or like moving your camera between the handlebar, engine guard, mirror stalk, and rear luggage rack during a single ride, a bolted U-bolt is too slow to reposition. The PGYTECH CapLock Super Clamp Mount combines a heavy-duty aluminum crab claw with the same geared rosette arm and dual-locking CapLock quick-release head found on PGYTECH’s U-bolt system.
Unlike budget photography crab clamps (such as the Ulanzi R094) that use smooth mini ball heads designed for stationary studio LED lights, the PGYTECH CapLock Super Clamp uses interlocking metal teeth inside its pivot joint and includes a foldable leverage tool stored inside the tightening handle. That extra clamping force allows it to grip round tubes from 17mm to 37mm as well as flat edges like thick adventure windscreens or billet luggage racks without creeping under vibration.
- Best for: Multi-bike owners and motovloggers who move their camera between handlebars, crash bars, luggage racks, and windscreens without tools.
- Clamping capacity: Grips 17mm to 37mm (0.67 to 1.45 inches) bars and flat surfaces; constructed from CNC aluminum alloy with rubberized inner jaws.
- Bonus role: Also works well as a secondary mid-shaft support clamp when bracing a long selfie stick along a tail rail.
How Motorcycle Mounting Works for 360 Cameras vs. Standard Action Cams
If you have previously rigged a Hero camera using our best GoPro motorcycle mounts guide or our GoPro mounts hub, transitioning to an Insta360 X6, X5, X4, or X3 requires rethinking three hardware details.
- 1/4-20 Threads vs. Plastic Folding Fingers: Standard GoPro cameras distribute weight low and close to the mounting buckle. Insta360 X-series cameras are taller, vertical candy-bar bodies weighing between 165 grams (X4 Air) and 203+ grams (X4, X5, and X6), and they connect via a female 1/4-20 threaded socket in the base. When mounting on a motorcycle, thread your camera or selfie stick directly onto a metal 1/4-20 stud whenever possible rather than stacking a plastic 1/4-20-to-2-prong adapter between the stick and the mount.
- The Invisible Selfie Stick Stitch Line: A 360 camera erases the selfie stick from the video only when the stick extends straight out from the bottom 1/4-20 socket, parallel to the camera’s narrow side profile. If you use an offset extension arm or angle the camera at 45 degrees on top of the pole, the mount enters the lens field of view and cannot be stitched out automatically.
- FlowState Digital Stabilization vs. Mechanical Shock: Insta360’s FlowState stabilization and 360 Horizon Lock eliminate rolling horizon tilt and low-frequency road bounce electronically. However, high-frequency engine buzz (common on high-revving inline-fours and big single-cylinder dual-sports) and long-pole whip create motion blur during low-light or evening rides. Rigid, ball-less clamps mounted close to structural frame welds produce noticeably sharper 8K and 5.7K video than clamps attached to flexible plastic fairings.
How to Set Up an Insta360 Motorcycle Stick for Third-Person Views
The signature shot that convinces most riders to buy an Insta360 camera is the third-person “video game” perspective floating behind the tail of the motorcycle. Setting up an Insta360 motorcycle stick safely at highway speeds requires more than clamping a single bracket to your bike and pulling the pole out to full length.
Use the Action Invisible Selfie Stick (Not the Standard Lightweight Stick)
Insta360 manufactures several different selfie sticks. The basic 114cm aluminum pocket stick sold for walking vlogs has thin walls that flex and ovalize under motorcycle wind pressure. For motorcycle riding, use the Insta360 Action Invisible Selfie Stick (100cm carbon-fiber reinforced with a twist-lock mechanism), which is engineered specifically to resist bending loads on vehicles.
Why Single-Point Clamps Fail on Extended Poles
Look closely at Insta360’s engineering manual for both the Heavy Duty Clamp and the U-Bolt Mount: when using a single mount as your only attachment point, Insta360 specifies extending the Action Invisible Selfie Stick to 100cm or less on smooth pavement and recommends securing the shaft of the stick to a second point on the motorcycle. When a 100cm to 120cm pole is supported only by the 1/4-20 thread at the very bottom, hitting a pothole at 70 mph concentrates all bending force onto a quarter-inch bolt, which can snap the base of the stick or shear the thread.
The Proven Two-Point Tail Mounting Method
To eliminate pole bounce and protect your camera on the highway, rig your rear third-person view using two contact points separated by 6 to 12 inches:
- Primary Base Anchor (Bottom of the Stick): Bolt an Insta360 Motorcycle U-Bolt Mount onto your metal passenger footpeg bracket or subframe tube, and thread the bottom 1/4-20 socket of the selfie stick onto the U-bolt stud.
- Secondary Mid-Shaft Support (Upper Brace): Attach a secondary support clamp (or heavy-duty UV-resistant nylon zip ties with a rubber sleeve) around the lower rigid section of the selfie stick and anchor it to your passenger grab rail, luggage rack tube, or tail frame. Supporting the stick 8 to 10 inches above its base reduces lever-arm stress on the bottom 1/4-20 thread by more than 70 percent and stops the camera from bouncing up and down in your footage.
Best Mounting Locations on a Motorcycle for an Insta360
Because a 360 camera records in every direction simultaneously, small changes in mounting location dramatically alter what the viewer sees.
1. Handlebar and Riser Clamp (Cockpit View)
Clamping the Insta360 Heavy Duty Clamp or PGYTECH CapLock U-Bolt directly to a 22mm (7/8-inch) or 28.6mm (1-1/8-inch) handlebar gives you two views from one recording: reframing forward shows the road over your windscreen, while reframing backward shows your helmet, torso, and steering inputs. Keep the camera mounted either directly on the clamp or extended just 6 to 10 inches so it clears your brake fluid reservoir without obstructing your view of the mirrors or instrument cluster.
2. Helmet Chin vs. Top Helmet Mount
Many riders search for an Insta360 helmet mount or Insta360 chin mount. While a top-of-helmet adhesive pad provides an unobstructed 360-degree “unicorn” view above traffic, sticking a tall vertical X5 or X4 on top of your helmet catches noticeable wind drag at highway speeds. For a true rider’s eye-level chin view without neck fatigue, flat-body cameras like the Insta360 Ace Pro 2 or the compact Insta360 GO 3S are much better suited to chin mounting than the taller X-series bodies. If you mount an X-series camera to a helmet or fairing using the Flexible Adhesive Mounts from the Motorcycle Bundle, clean the surface with isopropyl alcohol and press the 3M VHB pad firmly for 30 seconds at least 24 hours before riding.
3. Engine Guard and Crash Cage (Low Wheel & Suspension View)
Adventure motorcycles (like the BMW GS series, Honda Africa Twin, and Yamaha Tenere 700) and cruisers equipped with 25mm to 32mm crash bars offer an ideal low mounting point. Clamping the Heavy Duty Clamp to an engine guard captures the front suspension compressing over bumps alongside lean-angle perspectives in corners. Always verify that the camera body stays inside the outer tip-over envelope of the bike or position it where it cannot contact the front fender at full suspension bottom-out.
4. Fuel Tank and Windscreen (Tucked Sportbike POV)
On supersport motorcycles with clip-on handlebars (such as the Yamaha R6/R1, Kawasaki Ninja ZX-6R, or Suzuki GSX-R), exposed round handlebar space is minimal. Applying one of the bundle’s Flexible Adhesive Mounts to the front crown of the fuel tank or using a twist-lock suction cup on a smooth gloss tank places the camera cleanly behind the bubble windscreen, shielding the microphones from direct wind blast while capturing both the tachometer and the rider’s body position through corners.
Installation and Highway Safety Checklist
- Check Full Lock-to-Lock Steering Sweep: Before riding, sit on the motorcycle and turn the handlebars from full left lock to full right lock. Confirm that the clamp, thumb screw, and camera body do not contact the fuel tank, fairing stay, windscreen, or front brake master cylinder hose.
- Always Attach a Secondary Safety Tether: Even the strongest metal clamp relies on a single 1/4-20 threaded stud at the base of the camera. Loop a braided steel or high-strength nylon safety lanyard around your handlebar or frame tube and connect it to the mounting bracket, similar to the backup precautions we cover in our motorcycle mount tethers guide.
- Match the Rubber Spacer Ring to Your Bar Diameter: Never clamp bare aluminum jaws directly onto a painted or chrome handlebar without the proper rubber sizing ring. Metal-on-metal contact slips under vibration and mars your bar finish.
- Re-Check Bolt Torque After Your First 15-Minute Ride: Rubber anti-slip spacers compress slightly during the first heat and vibration cycle. Pull over after the first 10 to 15 miles and give the clamp wrench or U-bolt nut an extra quarter-turn if the rubber has settled.
Frequently Asked Questions
Is the official Insta360 Motorcycle Bundle worth buying, or should I buy the U-Bolt Mount instead?
Buy the Insta360 Motorcycle Bundle (V2) if you want a clamp you can move between your handlebars and crash bars plus two curved 3M adhesive mounts for your helmet or fuel tank. Buy the Insta360 Motorcycle U-Bolt Mount if you want a compact, bolt-on bracket that stays permanently attached to your handlebar or rear passenger peg bracket for third-person selfie stick shots.
Do the same mounts fit the Insta360 X6, X5, X4, and X3?
Yes. Every camera in the Insta360 X-series lineup (including the X6, X5, X4, X4 Air, X3, and ONE X2) uses the standard female 1/4-20 tripod thread on the bottom of the camera body. Even models equipped with magnetic quick-release bases retain the center 1/4-20 thread, so all five mounts in this guide fit across generations without buying new brackets when you upgrade your camera.
Why do Insta360 selfie sticks break on motorcycles, and how do I prevent it?
Selfie sticks break on motorcycles for three reasons: using the thin everyday vlog stick instead of the reinforced Action Invisible Selfie Stick, attaching the bottom of the stick through plastic two-prong GoPro fingers instead of a direct metal 1/4-20 stud, or extending the stick to 100cm+ at highway speed with only a single bottom clamp. Threading the Action stick directly onto a metal 1/4-20 U-bolt and adding a secondary support clamp 8 to 10 inches up the shaft prevents flex and breakage.
Does a 360 camera need a motorcycle vibration dampener like a smartphone?
Unlike smartphones with delicate mechanical Optical Image Stabilization (OIS) coils that suffer permanent hardware damage from engine vibration, action cameras like the Insta360 X5 and X4 use fixed-focus lenses paired with digital gyroscopic stabilization (FlowState). While the camera sensor will not break from normal handlebar vibration, high-frequency buzz on single-cylinder or V-twin engines can cause micro-blur in low light, which you can minimize by clamping close to the handlebar risers or addingInsta360’s dedicated Vibration Damper module on rough off-road bikes.
Bottom Line
For a dependable Insta360 motorcycle mount setup that will not droop, slip, or shear off at highway speed, skip generic ball-head crab clamps and choose hardware built specifically for rotational wind loads. The refreshed Insta360 Motorcycle Bundle (V2) (or the standalone Heavy Duty Clamp) is the best choice for handlebars and engine guards thanks to its ball-less worm-gear clamp, while the Insta360 Motorcycle U-Bolt Mount and the quick-release PGYTECH CapLock U-Bolt Mount are the smartest picks for semi-permanent bar or rear-tail selfie stick installations.
If you are outfitting the rest of your cockpit for navigation or camera protection, check out our best motorcycle handlebar phone mounts, our technical guide to motorcycle vibration dampeners and camera protection, and our comparison of the best GoPro motorcycle mounts.