 When you first purchased that adhesive dash mount, you thought it was so great that you really didn’t give much thought to taking it off one day. Perhaps you thought (like I do) that you will worry about that when the day comes, which you never really thought it would. Well now you are getting ready to sell your car, and guess what, that day has come. You try to just pull it off. The thing is stuck like someone took cement to the bottom.
Adhesive Mount Challenges
Most adhesive dash mounts use a very special glue disk called Very High Bond also known as VHB. It is a very expensive form of adhesive attached to a thin paper or rubber strip likely manufactured by 3M. Very expensive to purchase but also the best around for adhering lightweight mounts to a leather or plastic dashboard in a car. It is not made to come off easily.
How to Remove an Adhesive Dash Mount
So what do you do? Fortunately there is a way to remove these mounts while inflicting little to no damage to your dashboard.
First, do not attempt to remove your mount in a cold environment. If you live in the northern part of the country and it’s the winter, take a hair dryer out to your car and warm up the area where the mount is attached to your dash. After doing that, take a thin butter knife and very slowly begin to cut away at the paper or rubber that has the adhesive attached to it. Be very careful to not cut into the dashboard. Exert a slight upward pressure on the mount while you slowly ease the butter knife under it.
Hopefully once you get that done, the mount has come loose. You will likely be left with some glue or paper residue on your dash.
Extra Help for Removing an Adhesive Dash Mount
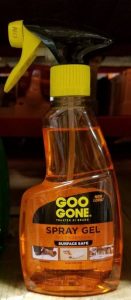
Goo Gone is the answer to this dilemma. This stuff is incredible at removing adhesive residue from surfaces such as a dashboard and I have never know it to stain. I like using Goo Gone Adhesive Remover.
Lay down a small amount of Goo Gone on the adhesive residue and let it soak in for ten minutes. Attack it with a clean rag and apply some pressure. You will hopefully get it all in the first shot but you may need to apply a few coats of Goo Gone for complete removal of the mount. The nice part about Goo Gone is that it does not matter how long the mount was there, it will still work.
You may notice the spot where the mount was attached is slightly lighter but that’s not because of the Goo Gone, that’s what the color of the dash looked like when you first attached the mount as the sun and dirt will discolor your dash over time.
Another product which is a little different versus the fluids and gels is the General Purpose Adhesive Cleaner made by 3M. This is an aerial spray made to remove epoxies. I have found that the gel from Goo Gone is easier to work with versus a spray but this might work better depending upon the adhesive type that’s been used. This is a spray and I recommend spraying onto a paper towel or rag and not on the surface as it’s more controllable.
You can supplement this with a Plastic Razor Blade Kit for added cleaning ability. These razor blades are made of plastic to minimize potential damage to your dash. Don’t use metal razor blades as these will likely damage the dash.
Hopefully this article helped to make your dash look as good as before you applied the adhesive mount. Don’t be afraid to buy another one for your new car now that you know the secret for removal.
If you’re ready to get a new phone or GPS mount, take a few moments to read our articles entitled Choosing the Right Cell Phone Car Mount or Choosing the Right GPS Car Mount.
