 The Nest Protect is a big step forward in smoke and CO detectors. It’s a smart detector that integrates into the Nest app that is used for the popular Nest Cam line of home security cameras. The app allows you to check the status and even do a reliability test from the convenience of your armchair.
There are two types of connectivity hence two different models. The Battery Powered Nest Protect provides the most flexibility in placement however you will need to replace the battery periodically. Battery life is stated by Nest as being multiple years. The Wired Nest Protect uses electrical wiring within your home and provides the least amount of placement flexibility but on a positive note, no worries about changing the batteries.
Our advice applies to the second gen Nest Protect although some of it will also can be applicable to the first gen too.
Ever try to mount one of these? Not easy. There’s also very little information in terms of where to put it. We’ll cover both of these topics.
Where to Put a Nest Protect
Our comments in this section apply to the battery operated and wired models. Your selection of model type is dictated by if you already have wiring available. Be sure to check local regulations. Most fire departments will provide advice on smoke and CO detector placement.
Minimally, install a Nest Protect outside each bedroom and have one on every floor. The device should be placed on a ceiling at least four inches from a wall. If the ceiling is sloped, the detector should be located from 3 to 36 inches away from the peak. Again, be sure to consult local regulations before selecting where this should go.
How to Mount a Nest Protect
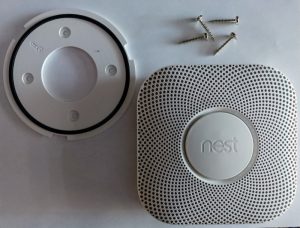
A photo of what comes in the box accompanies this article. Unlike practically every mainstream Nest device, the Nest Protect has next to no third-party mounts but there are a few.
One such part is the Nest Replacement Plate. This has a lot more mounting holes than the one you get from Nest. Use this if the one on the box does not line up with your current setup or you simply lost the mounting plate.
Be sure to install the batteries and get the Nest Protect setup with your phone prior to installation. It’s easier and if there is a problem that necessitates a return of the device, you won’t need to take it off the ceiling and patch up to the mounting holes from the screws. Once the device is connected to the internet and you’re happy with the functionality, physically install it to the ceiling.
You get a round mounting base and four wood screws. The screws are self tapping so there’s no need to drill any holes prior to mounting. The back plate is the large somewhat flat round part. That attaches to the ceiling first using the self tapping screws. The Nest logo faces away from the ceiling and toward you.
Once the back plate is attached to the ceiling, it’s time to attach the Nest Protect. It’s not that easy and for what it’s worth, even your basic smoke alarm, is challenging, so why should this be any different. Hold the Nest Protect against the back plate and turn it clockwise until you feel the tabs insert into the grooves of the back plate. This is often the most challenging part of the physical installation. It requires some patience to line up the tabs and grooves.
